<?xml version="1.0" encoding="utf-8"?><feed xmlns="http://www.w3.org/2005/Atom" ><generator uri="https://jekyllrb.com/" version="4.4.1">Jekyll</generator><link href="/feed.xml" rel="self" type="application/atom+xml" /><link href="/" rel="alternate" type="text/html" /><updated>2026-09-23T20:16:41+00:00</updated><id>/feed.xml</id><title type="html">Secret Science Lab</title><entry><title type="html">Raspberry pi robot: real-time object detection using remote Tensorflow server</title><link href="/code/robots/2020/02/04/raspberry-pi-robot-live-object-detection.html" rel="alternate" type="text/html" title="Raspberry pi robot: real-time object detection using remote Tensorflow server" /><published>2020-02-04T00:00:00+00:00</published><updated>2020-02-04T00:00:00+00:00</updated><id>/code/robots/2020/02/04/raspberry-pi-robot-live-object-detection</id><content type="html" xml:base="/code/robots/2020/02/04/raspberry-pi-robot-live-object-detection.html"><![CDATA[<p>Finished product first:</p>

<p>https://youtu.be/HLUN1U3x1XU</p>

<p>The video above shows real-time objection detection using a neural network model called Single Shot MultiBox Detector (SSD). The neural network model was trained on (and runs with) Tensorflow.</p>

<p>The “AI” model works much better than older Computer Vision (OpenCV) techniques. For example, here’s an example of a previous attempt to track objects with the color “tomato”. The way that worked was by filtering a camera frame for a specific color, then masking out that color to find the contour of an object.</p>

<p>https://youtu.be/fPDM4E8S7_4</p>

<p>There were many problems with this approach. For example, color-based detection is sensitive to lighting changes. It performs differently depending on whether it’s day or night time. Also, we get false detections because many other objects in the scene may have the same color.</p>

<p>But, one advantage of classic OpenCV techniques is they’re simple and fast. Fast enough to run in real time on a live camera feed on a tiny Raspberry Pi processor.</p>

<p>On the other hand, AI models are more accurate and powerful. They can detect many different objects in various orientations (even if they’re partially hidden or chopped out of frame). They’re less sensitive to lighting changes. </p>

<p>But the downside is they’re expensive to run. The Raspberry Pi doesn’t have quite enough horsepower. I tried it and it’s possible… but I wasn’t happy with the performance. I found some interesting USB AI accelerators like Google’s <a href="https://coral.ai/products/accelerator">Coral</a> but they’re pricey. </p>

<p>So I decided to go with the “Mars Rover” approach and use a remote inference server (running on a PC in my living room). This buys us “infinite” computing power for a fixed cost of network latency. As long as your network is fast, this scheme works well.</p>

<p>One thing going for us is even though the Raspberry Pi camera can capture HD images, the SSD AI model only needs 300x300 pixel inputs. So we can downsize the images before sending them over the network to improve performance.</p>

<p>Here’s the Raspberry Pi code. All it does is capture frames, encode them as Base64 strings and makes requests to our remote inference server: </p>

<div class="language-plaintext highlighter-rouge"><div class="highlight"><pre class="highlight"><code>#/usr/bin/python

import base64
import cv2
import json
import picamera
from picamera.array import PiRGBArray
import requests
import time
import zmq

def process_target(image, x1, y1, x2, y2, label='target'):
  font = cv2.FONT_HERSHEY_SIMPLEX
  cv2.putText(image, "%s detected" % label,
    (20,30), font, 0.5,(255,255,255),1,cv2.LINE_AA)

  X = int((x2 + x1)/2)
  Y = int((y2 + y1)/2)

  ########################################################
  # TODO: do something with the detected target at (X,Y)
  ########################################################

  if X &lt; 280 and X &lt; 340 and Y &gt; 230 and Y &lt; 250:
    # ON TARGET - red cross, red rectangle
    cv2.line(image,(300,240),(340,240),(64,64,255),1)
    cv2.line(image,(320,220),(320,260),(64,64,255),1)
    cv2.rectangle(image,(int(x1),int(y1)),(int(x2),int(y2)),(64,64,255),1)
  else:
    # white rectangle
    cv2.rectangle(image,(int(x1),int(y1)),(int(x2),int(y2)),(255,255,255),1)

def detect_objects(image, jpgstr, scale=2):
  URL = "http://192.168.1.187:9002/predict"
  response = requests.post(URL, data={"frame": jpgstr})
  ret = json.loads(response.text)

  if 'success' not in ret or ret['success'] != True:
    return

  # green cross
  cv2.line(image,(300,240),(340,240),(128,255,128),1)
  cv2.line(image,(320,220),(320,260),(128,255,128),1)

  # get largest box
  targets = ["person", "dog", "cat", "book", "teddy bear", "sports ball", "banana"]
  priorityTargets = ["dog", "cat", "book", "teddy bear", "sports ball", "banana"]
  target = None
  boxes = ret['boxes']
  for b in boxes:
    if b['label'] not in targets:
      continue 
    
    # annotate boxsize
    rect = b['bbox']
    b['boxsize'] = (rect[2]-rect[0]) * (rect[3]-rect[1])

    if target == None:
      target = b
    elif b['boxsize'] &gt; target['boxsize'] \
      or (b['label'] in priorityTargets and  target['label'] not in priorityTargets):
      target = b

  if target:
    rect = target['bbox']
    process_target(image, 
      rect[0]*scale, rect[1]*scale, rect[2]*scale, rect[3]*scale, 
      target['label'])

  cv2.imshow('frame', image)
  cv2.waitKey(1)

def camera_loop():
  zcontext = zmq.Context()
  zsock = zcontext.socket(zmq.PUB) 
  zsock.bind('tcp://*:5555')
  camera = picamera.PiCamera()
  camera.resolution = (640, 480)
  camera.framerate = 7
  rawCapture = PiRGBArray(camera, size=(640, 480))

  for frame in camera.capture_continuous(rawCapture, 
    format="bgr", use_video_port=True):
    try:
      image = frame.array
      scale = 2
      halfsizeImage = cv2.resize(image, 
        (int(image.shape[1]/scale), int(image.shape[0]/scale)), cv2.INTER_AREA)

      encoded, buffer = cv2.imencode('.jpg', halfsizeImage)
      jpgstr = base64.b64encode(buffer)
      zsock.send(jpgstr)

      detect_objects(image, jpgstr, scale)   
      
      rawCapture.truncate(0)
    except Exception as e:
      rawCapture.truncate(0)

</code></pre></div></div>

<p>Now for the object detection neural network. Google provides a set of pre-trained models for object detection in their <a href="https://github.com/tensorflow/models/blob/master/research/object_detection/g3doc/detection_model_zoo.md">Model Zoo.</a> The model I picked was <a href="http://download.tensorflow.org/models/object_detection/ssdlite_mobilenet_v2_coco_2018_05_09.tar.gz">ssdlite_mobilenet_v2_coco</a>. You’ll also need this file to convert the detection IDs to text labels: <a href="https://github.com/amikelive/coco-labels/blob/master/coco-labels-paper.txt">coco-labels-paper.txt</a> </p>

<p>I made a Python module to load and run the pre-trained Tensorflow object detection model. The class <em>Predictor</em> in <em>coco_predictor.py</em>  below loads the saved model and provides a <em>predict()</em> function for running inference on new input images.</p>

<p>coco_predictor.py</p>

<div class="language-plaintext highlighter-rouge"><div class="highlight"><pre class="highlight"><code>#!/usr/bin/python
# https://github.com/opencv/opencv/wiki/TensorFlow-Object-Detection-API

import cv2 as cv
import tensorflow as tf

class Predictor:
  def __init__(self, savedModel, labels):
    # load labels
    f = open(labels, "r")
    self.labels = [l.strip() for l in f.readlines()]
    f.close()

    # Read the graph.
    with tf.gfile.FastGFile(savedModel, 'rb') as f:
      self.savedModel = savedModel
      self.graphDef = tf.GraphDef()
      self.graphDef.ParseFromString(f.read())

      # Restore session
      self.sess = tf.Session()
      self.sess.graph.as_default()
      tf.import_graph_def(self.graphDef, name='')

  def predict(self, img, thresh):
    rows = img.shape[0]
    cols = img.shape[1]
    inp = cv.resize(img, (300, 300))
    inp = inp[:, :, [2, 1, 0]]  # BGR2RGB

    # Run the model
    out = self.sess.run(\
      [self.sess.graph.get_tensor_by_name('num_detections:0'),
       self.sess.graph.get_tensor_by_name('detection_scores:0'),
       self.sess.graph.get_tensor_by_name('detection_boxes:0'),
       self.sess.graph.get_tensor_by_name('detection_classes:0')],
       feed_dict={'image_tensor:0': inp.reshape(1, inp.shape[0], inp.shape[1], 3)})

    detections = []

    num_detections = int(out[0][0])
    for i in range(num_detections):
      classId = int(out[3][0][i])
      score = float(out[1][0][i])
      bbox = [float(v) for v in out[2][0][i]]
      if score &lt;= thresh:
        continue

      x = bbox[1] * cols
      y = bbox[0] * rows
      right = bbox[3] * cols
      bottom = bbox[2] * rows

      detections.append({
        'label': self.labels[classId-1],
        'score': score,
        'bbox': [x, y, right, bottom]
      })

    return detections

</code></pre></div></div>

<p>Finally, the Flask inference server that runs on a PC. The Raspberry Pi sends it images and it replies with detections:</p>

<p>coco_flask_server.py</p>

<div class="language-plaintext highlighter-rouge"><div class="highlight"><pre class="highlight"><code>#!/usr/bin/python
import base64
import cv2
import coco_predictor
import logging
import sys
import numpy as np

logging.basicConfig(stream=sys.stdout, level=logging.DEBUG)

model = "models/ssdlite_mobilenet_v2_coco_2018_05_09/frozen_inference_graph.pb"
labels = "models/coco-labels-paper.txt"
predictor = coco_predictor.Predictor(model, labels)

def mlexec(query):
  boxes = []
  try:
    img = query['img']
    boxes = predictor.predict(img, 0.3)
  except Exception as e:
    logging.error(str(e))

  response = {
    'success': True,
    'boxes': boxes
  }
  return response

logging.info("Start COCO server...")

from flask import Flask, jsonify, request
application = Flask(__name__)

@application.route('/')
def index():
  return 'Hello!'

@application.route('/predict', methods=['GET', 'POST'])
def predict():
  if request.method == 'GET':
    return ':)'

  response = { 'success': False }
  try:
    frame = base64.b64decode(request.form['frame'])
    npimg = np.fromstring(frame, dtype=np.uint8)
    img = cv2.imdecode(npimg, 1)
    query = { 'img': img }
    response = mlexec(query)
  except Exception as e:
    logging.error(str(e))

  return jsonify(response)

if __name__ == '__main__':
  application.run(host="0.0.0.0", port=9002, debug=True)
</code></pre></div></div>

<p>Oh, and if you’re curious about the Robot Kit I’m using, it’s made by Adeept. They call it the <a href="https://amzn.to/31qyYqN">Mars Rover PiCar-B</a>:</p>

<figure>

![](/assets/images/2020-02-04-raspberry-pi-robot-live-object-detection/adeeptPiCarB-300x300.jpg)

<figcaption>

Mars Rover PiCar-B

</figcaption>

</figure>

<p>The hardware is excellent and well-designed. All the pieces fit together perfectly and mount onto a solid acrylic chassis with bolts. There is a steering rack and a RWD drivetrain that sends power from one motor to both rear wheels. You can pretty much follow the instructions and everything fits together like a Lego set. And when you’re not using it in robot mode, it’s a good looking “case” that lets you use it like a regular Raspberry Pi on your desk.</p>

<p>The software, however, is so-so. You definitely need programming experience. Some things might not work right out of the box, and some things need fiddling around with. On the plus side, they do provide tons of working code for all the various sensors, servos and components. So as long as you are comfortable with Python, you can use their code as excellent references. You can pick and choose and mix and match what you need.</p>

<p>I like this robot kit because it uses a Raspberry Pi (which I already have). So it uses standard Linux stuff. You can use state-of-the-art software and write regular programs like a civilized person. And because it uses a Pi, you get WiFi, Ethernet, Bluetooth, USB, HDMI, etc for free. No painful caveman Arduino programming. It runs on CR 18650 lithium ion batteries (which I also have from salvaging old laptop batteries). It can also run on the regular Pi USB power source.</p>

<ul>
  <li>
    <p><img src="/assets/images/2020-02-04-raspberry-pi-robot-live-object-detection/twitchyBuild3-1024x768.jpg" alt="" /></p>
  </li>
  <li>
    <p><img src="/assets/images/2020-02-04-raspberry-pi-robot-live-object-detection/twitchyBuild2-1024x768.jpg" alt="" /></p>
  </li>
  <li>
    <p><img src="/assets/images/2020-02-04-raspberry-pi-robot-live-object-detection/twitchyBuild1-1024x768.jpg" alt="" /></p>
  </li>
</ul>

<p>“Behind the scenes”: <a href="https://youtu.be/xtWnFEkrIdM">Driving school</a>. <a href="https://youtu.be/GcTBRAQ-Y24">Programming the head.</a></p>

<p>I hope to make it autonomous and self-recharging one day!</p>

<p>Happy hacking!<br />
aaron@secretsciencelab.com</p>]]></content><author><name></name></author><category term="code" /><category term="robots" /><category term="adeept" /><category term="ai" /><category term="camera" /><category term="computer-vision" /><category term="cv" /><category term="flask" /><category term="machine-learning" /><category term="mars-rover" /><category term="mars-rover-picar-b" /><category term="object-detection" /><category term="opencv" /><category term="pi" /><category term="python" /><category term="raspberry-pi" /><category term="server" /><category term="ssd" /><category term="tensorflow" /><category term="twitchy" /><summary type="html"><![CDATA[Finished product first:]]></summary></entry><entry><title type="html">How to make a webapp/server that can read &amp;amp; react to emails</title><link href="/code/robots/2018/03/01/how-to-make-a-webapp-server-that-can-read-react-to-emails.html" rel="alternate" type="text/html" title="How to make a webapp/server that can read &amp;amp; react to emails" /><published>2018-03-01T00:00:00+00:00</published><updated>2018-03-01T00:00:00+00:00</updated><id>/code/robots/2018/03/01/how-to-make-a-webapp-server-that-can-read-react-to-emails</id><content type="html" xml:base="/code/robots/2018/03/01/how-to-make-a-webapp-server-that-can-read-react-to-emails.html"><![CDATA[<p>In the <a href="https://secretsciencelab.com/how-to-send-emails-with-google-assistant-or-google-home/">last post</a>, we talked about how to teach your Google Home device (or Google Assistant on your Android phone) to send emails.</p>

<p>But that itself is not too interesting (unless you really enjoy spamming yourself). What would be more useful is if you create a program to read and act on the emails automatically. Because, then, you have the ingredients for building your own Virtual Assistant.</p>

<p>The simplest (and cheapest way) I found to do this is using <a href="https://cloud.google.com/appengine/">Google App Engine</a>. It has a generous daily free quota. For all my home automation projects, I haven’t run above the free limit.</p>

<p>Start by following the “hello world” instructions to make your first web app: <a href="https://cloud.google.com/appengine/docs/standard/python/quickstart">https://cloud.google.com/appengine/docs/standard/python/quickstart</a></p>

<p>Then, add the files/code below to enhance your web app to handle emails. (Note: the code I provided below is an example of how I use email to control my <a href="https://secretsciencelab.com/sprinkler-brain-cactus-micro-arduino-wi-fi-multi-zone-smart-sprinklers-diy-for-under-20/">home sprinkler system</a>. This lets me say “Turn on sprinkler 1” to my Google Home Mini, which triggers IFTTT to send an email to my web app, which reads the email and triggers my home sprinkler system to turn on zone 1.)</p>

<p>app.yaml:</p>

<div class="language-plaintext highlighter-rouge"><div class="highlight"><pre class="highlight"><code>application: your_appengine_application_name
version: 1-0
runtime: python27
api_version: 1
threadsafe: true
  
default_expiration: "30m"

handlers:
- url: /_ah/mail/.+
  script: receive_mail.app
  login: admin

inbound_services: 
- mail

</code></pre></div></div>

<p>receive_mail.py:</p>

<div class="language-plaintext highlighter-rouge"><div class="highlight"><pre class="highlight"><code>from handlers_mail import *  
import webapp2
from google.appengine.ext.webapp.mail_handlers import InboundMailHandler
      
app = webapp2.WSGIApplication([ReceiveMail.mapping()], debug=True)

</code></pre></div></div>

<p>handlers_mail.py:</p>

<div class="language-plaintext highlighter-rouge"><div class="highlight"><pre class="highlight"><code>import logging
import webapp2
from google.appengine.ext.webapp.mail_handlers import InboundMailHandler

class ReceiveMail(InboundMailHandler):
  def receive(self, message):
    tos = message.to.split(',')
    for to in tos:
      logging.info("received mail from %s %s %s" \
        % (message.sender, to, message.subject))
      if 'sprinkler' in to:
        handleSprinklerEmail(message)

def handleSprinklerEmail(message):
  if 'your@email.com' not in message.sender:
    # sender unknown - ignore this message
    return

  logging.info("sprinkler email request from %s %s" \
    % (message.sender, message.subject))

  # process email to get body
  bodies = message.bodies('text/plain')
  bodyText = ''
  for ctype, body in bodies:
    lastLine = [i for i in body.decode().split('\n') if i][-1]
    bodyText = lastLine
    break

  # you can now decide what to do based on:
  #   message.subject
  #   bodyText

</code></pre></div></div>

<p>After you set up the above, you can send emails to your Google App Engine web app using its special address: <em>this_can_be_anything</em>@<em>your_appengine_application_name</em>.appspotmail.com</p>

<p>Now that you have a web app, there’s much more you can do beyond handling emails. It opens up a couple more opportunities for your home automation. E.g.:</p>

<ul>
  <li>Use this web app as a trusted HTTP server that your smart devices can fetch instructions from</li>
  <li>Use this web app to serve a web GUI for your devices/projects</li>
  <li>Use this web app (which supports HTTPS) to authenticate users and securely control your smart devices</li>
</ul>

<p>Give it a go. I think the code I gave you above should work. If I missed something, please let me know at aaron@secretsciencelab.com. Happy hacking!</p>]]></content><author><name></name></author><category term="code" /><category term="robots" /><category term="email" /><category term="gmail" /><category term="google-appengine" /><category term="sprinkler" /><category term="virtual-assistant" /><summary type="html"><![CDATA[In the last post, we talked about how to teach your Google Home device (or Google Assistant on your Android phone) to send emails.]]></summary></entry><entry><title type="html">How to send emails with Google Assistant / Google Home</title><link href="/robots/2018/02/20/how-to-send-emails-with-google-assistant-or-google-home.html" rel="alternate" type="text/html" title="How to send emails with Google Assistant / Google Home" /><published>2018-02-20T00:00:00+00:00</published><updated>2018-02-20T00:00:00+00:00</updated><id>/robots/2018/02/20/how-to-send-emails-with-google-assistant-or-google-home</id><content type="html" xml:base="/robots/2018/02/20/how-to-send-emails-with-google-assistant-or-google-home.html"><![CDATA[<p>I got a Google Home Mini for $19 last Black Friday, and my family has been having fun with it. My kids like to ask it questions and play music on it. I’ve set it up with voice shortcuts so my kids can say, “Call mom” or “Call dad” to phone me from the Google Home itself (in case of an emergency). It works as a regular Bluetooth speaker and it also knows many useless party tricks.</p>

<p>But most interesting to me is I now have a natural language voice interface for all my projects! With the Google Home / Google Assistant, I can control things with my voice, like how Tony Stark talks to J.A.R.V.I.S. And as someone who was born before the Internet, it is amazing to me that I can do this with a $19 device that sits on my kitchen counter.</p>

<p>But what good is an “Assistant” if it can’t send emails? Not very, if you ask me. So in this guide, I’m going to share with you how I set up my Google Home Mini to send emails. By the way, this works for any Google Assistant interface (like on your Android phone), so it works even if you don’t have a Google Home.</p>

<p>To send emails with Google Home, there are 2 ingredients: IFTTT and Gmail. I’ll assume you have a Gmail account, so we’ll just focus on setting up IFTTT.</p>

<p>IFTTT is a free service at <a href="http://ifttt.com">ifttt.com</a>. IFTTT stands for “If <em>this</em>, then <em>that</em>.” Or more specifically, “If <em>x happens</em>, then <em>do y</em>.” IFTTT hooks up with all kinds of standards and protocols and services so that you can replace the <em>x</em> and <em>y</em> with anything.</p>

<p>Some example IFTTT “recipes” are: If <em>it is dark outside</em>, then <em>turn on the lights</em>. If <em>it is going to rain tomorrow</em>, then <em>disable the sprinklers</em>. If <em>the temperature drops below ___</em>, then <em>set thermostat to ___</em>. If <em>you tell Google Home “Email Joe and say ___“</em>, then <em>send gmail to joe@joe.com with ___</em> .</p>

<p>I’m going to explain how to do that last “recipe”. It’s not that hard, and just a matter of setting up IFTTT.</p>

<p>1) Make a new “If this then that” applet on <a href="https://ifttt.com">ifttt.com</a>. Google Assistant will be the “this” part of the recipe and Gmail will be the “that” part. 2) Connect Google Assistant to your IFTTT account. You can program it to trigger an action when you speak a special phrase. 3) Connect a Gmail account to your IFTTT account. It does not have to be your main Gmail account. You can make a new account just for IFTTT mails. When you say your special phrase to Google Assistant, you can program it to send a special email. (<a href="https://www.techadvisor.co.uk/how-to/digital-home/how-send-email-on-google-home-3661524/">More detailed instructions here.</a>)</p>

<p>Next, I’ll show you <a href="https://secretsciencelab.com/how-to-make-a-webapp-server-that-can-read-react-to-emails/">how to configure a Google App Engine web app to receive emails</a>. This setup can be used to relay information to your smart devices or control them for free. (I’ll be using it to control my <a href="https://secretsciencelab.com/sprinkler-brain-cactus-micro-arduino-wi-fi-multi-zone-smart-sprinklers-diy-for-under-20/">home sprinkler system</a>.)</p>]]></content><author><name></name></author><category term="robots" /><category term="gmail" /><category term="google-assistant" /><category term="ifttt" /><category term="robots" /><summary type="html"><![CDATA[I got a Google Home Mini for $19 last Black Friday, and my family has been having fun with it. My kids like to ask it questions and play music on it. I’ve set it up with voice shortcuts so my kids can say, “Call mom” or “Call dad” to phone me from the Google Home itself (in case of an emergency). It works as a regular Bluetooth speaker and it also knows many useless party tricks.]]></summary></entry><entry><title type="html">How to start using NodeMCU for WiFi projects (Goodbye Arduino?)</title><link href="/robots/2017/02/18/how-to-start-using-nodemcu-for-wifi-projects-goodbye-arduino.html" rel="alternate" type="text/html" title="How to start using NodeMCU for WiFi projects (Goodbye Arduino?)" /><published>2017-02-18T00:00:00+00:00</published><updated>2017-02-18T00:00:00+00:00</updated><id>/robots/2017/02/18/how-to-start-using-nodemcu-for-wifi-projects-goodbye-arduino</id><content type="html" xml:base="/robots/2017/02/18/how-to-start-using-nodemcu-for-wifi-projects-goodbye-arduino.html"><![CDATA[<p>Ah Arduino. You were my first gateway to making tiny electronic widgets that interact with the world. I’ve played with platforms that range from small and simple to expensive and complex like FPGAs, but nothing beats the cost and ease-of-use of Arduinos for making tiny devices you sprinkle around your home. Until now…</p>

<p>See the thing is, WiFi has become as common as electricity in many countries. So I keep finding that I want all my devices to connect to the internet – something that Arduino doesn’t do very well. Especially if you want to talk at a higher level; like with HTTP or MQTT. Plus, getting WiFi-enabled Arduino chips or going with alternative platforms like Electric Imp can get pricey.</p>

<p>So that led me to a family of devices built around the ESP8266 chip. Not only do these tend to be cheaper than Ardunios, they have integrated WiFi! (E.g.: <a href="https://www.aliexpress.com/item/D1-mini-V2-Mini-NodeMcu-4M-bytes-Lua-WIFI-Internet-of-Things-development-board-based-ESP8266/32681374223.html">D1 mini NodeMCU</a>).</p>

<p>But I noticed something popular among users of these devices. They don’t use the normal Arduino platform, but instead a different NodeMCU firmware. I looked it up and what I liked about it was that its firmware libraries help you do many complex things you normally want to, easily. E.g., you can make your NodeMCU device a web server, or talk MQTT with just a few lines of code.</p>

<p>So I got a NodeMCU chip for under $3 to play with one weekend. I figured out how to flash the firmware and upload my code to it. The process is slightly different from using an Arduino. So I compiled all my notes, scripts and whatever else I needed into a bare-bones package. I plan to use this as my personal template for starting new NodeMCU projects. Since it might be useful to others too, I posted it to github here: <a href="https://github.com/secretsciencelab/nodemcu-skeleton">https://github.com/secretsciencelab/nodemcu-skeleton</a></p>

<p>The broad steps for starting a NodeMCU project are:</p>

<ol>
  <li><a href="https://hub.docker.com/r/marcelstoer/nodemcu-build">Download and build the firmware</a>. I recommend using the Docker option. That way, all you do is download the firmware source code from git, customize it (optional), then use docker to build it.</li>
  <li>Flash the firmware. The flash command is also in the link in the previous step. Or check out “flash.sh” in my <a href="https://github.com/secretsciencelab/nodemcu-skeleton">nodemcu-skeleton git</a>.</li>
  <li>Upload your code using <a href="https://github.com/4refr0nt/luatool">luatool</a>. See “upload.sh” in my <a href="https://github.com/secretsciencelab/nodemcu-skeleton/tree/master/projects/test">git’s ‘test’ dir</a> for reference.</li>
</ol>

<p>Although the steps are more ‘manual’ than with Arduino, I actually like it better. I never liked working in the clunky Arduino IDE. I prefer coding in my favorite editor, then uploading to the device via command-line. Working with NodeMCU does come with its own quirks, but they’re not too bad once you get into the groove.</p>

<p>I am still experimenting with these $3 NodeMCU chips, but so far I’m liking it. My first project was a sound monitor to keep an ear on the house while we were away for a few days. This was mainly because my wife was worried about leaks from her new aquarium setup. So first, we placed regular water alarms under the aquariums. The sound monitor measures the sound level continuously and streams the data to the web (via Thingspeak). Then I have a cron job that watches the data stream and emails me if anything looks funny. It’s sensitive enough to detect anything from doorbells, loud conversations and microwave beeps… to water alarms and fire alarms.</p>

<p>I might switch to these NodeMCUs as my go-to device for all my future projects!</p>

<p>Happy hacking :)</p>]]></content><author><name></name></author><category term="robots" /><category term="esp8266" /><category term="nodemcu" /><summary type="html"><![CDATA[Ah Arduino. You were my first gateway to making tiny electronic widgets that interact with the world. I’ve played with platforms that range from small and simple to expensive and complex like FPGAs, but nothing beats the cost and ease-of-use of Arduinos for making tiny devices you sprinkle around your home. Until now…]]></summary></entry><entry><title type="html">DIY home automation almost-instant-response WIFI smart switch for &amp;lt; $16 with MQTT</title><link href="/robots/2016/05/08/diy-home-automation-almost-instant-response-wifi-smart-switch-for-16-with-mqtt.html" rel="alternate" type="text/html" title="DIY home automation almost-instant-response WIFI smart switch for &amp;lt; $16 with MQTT" /><published>2016-05-08T00:00:00+00:00</published><updated>2016-05-08T00:00:00+00:00</updated><id>/robots/2016/05/08/diy-home-automation-almost-instant-response-wifi-smart-switch-for-16-with-mqtt</id><content type="html" xml:base="/robots/2016/05/08/diy-home-automation-almost-instant-response-wifi-smart-switch-for-16-with-mqtt.html"><![CDATA[<p>Parts list:</p>

<ul>
  <li><a href="http://www.ebay.com/itm/DC-12V-15W-1-25A-Universal-Regulated-Switching-Power-Supply-For-LED-Light-strip-/371619560860?hash=item5686407d9c:g:2H4AAOSwEK9T6s7V">AC/DC 12V 15W 1.25A “LED light strip” power supply</a> - $2.33</li>
  <li><a href="http://www.ebay.com/itm/381468071413">Mini-360 DC/DC step down converter 4.75V-23V to 1V-17V</a> - $0.62</li>
  <li><a href="http://www.ebay.com/itm/2sets-Cactus-Micro-Rev2-Arduino-compatible-plus-esp8266-/252134909396">Cactus Micro (Rev2)</a> - $12<br />
  (Alternative: <a href="http://www.aliexpress.com/item/Smart-Electronics-D1-mini-Mini-NodeMcu-4M-bytes-Lua-WIFI-Internet-of-Things-development-board-based/32627770995.html">D1 mini NodeMCU</a> - $3.73, but my instructions below are for Cactus Micro)</li>
  <li><a href="http://www.aliexpress.com/item/1-Channel-5V-Relay-Module-for-SCM-Household-Appliance-Control/1125290860.html?ws_ab_test=searchweb201556_0,searchweb201602_5_10037_10017_10034_10021_507_10022_10032_10020_10018_10019,searchweb201603_2&amp;btsid=d3dc559e-8aaf-47da-bca7-80e812842ea4">Relay</a> - $0.60</li>
</ul>

<p>Total: $15.55 ($7.28 if you go with the mini NodeMCU)</p>

<p><strong>WARNING!!! this switch can switch up to 110/240V AC @ 10A. This is more than enough to cook your insides or “stop” your heart and kill you. Do not play with your house mains unless you know what you’re doing and you understand the risks. One mistake and you’re dead. If you’re not sure, close this page. It’s not worth it.</strong></p>

<p>I made this WiFi switch to add an IP camera to the outside of my house, without having to run new power lines to it. The idea was to tap into the 110V AC of an existing outdoor porch light to power my camera. I would then keep the switch to the light ON all the time, to power my camera ON all the time. But I didn’t want my porch light to be on all the time. So, a WiFi smart switch will replace the wall switch to control the light. This was acceptable, since we don’t turn the porch light on/off frequently, and it’s better off scheduled (turn on at night) or automated (turn on when motion detected).</p>

<p>My only constraint was that everything had to fit into an in-wall power conduit or switch box. The largest part was the AC/DC transformer/power supply. I managed to find a 1.25A power supply that is 70 x 39 x 31 mm. As a bonus, you can open its metal case and pack your microcontroller and other electronics inside it:</p>

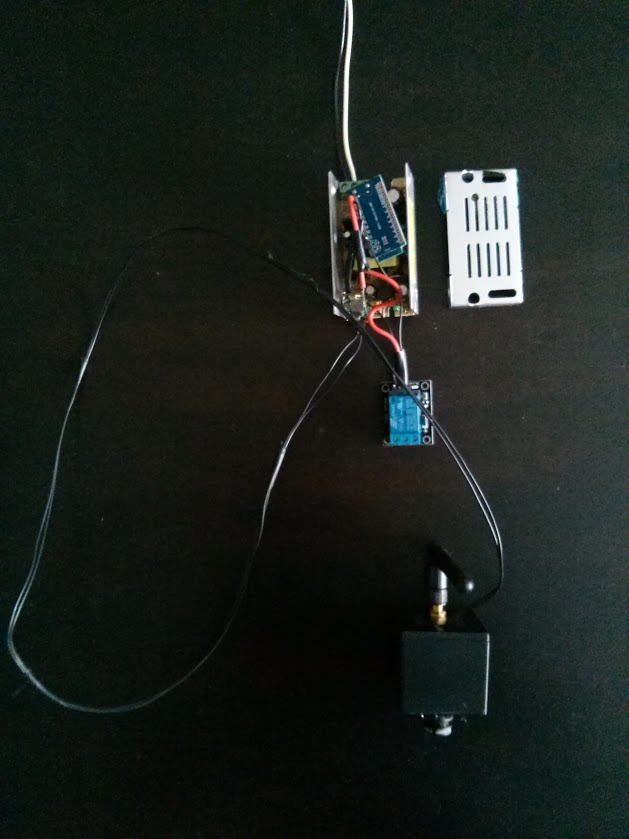
<p>[caption id=”attachment_457” align=”alignnone” width=”629”]<a href="https://secretsciencelab.com/wp-content/uploads/2016/05/image-6.png"><img src="/assets/images/2016-05-08-diy-home-automation-almost-instant-response-wifi-smart-switch-for-16-with-mqtt/image-6.png" alt="Open the metal case, pack it in. AC comes in the top. DC goes out the bottom to the Relay, microcontroller and my IP camera." /></a> Open the metal case, pack it in. AC comes in the top. DC goes out the bottom to the Relay, microcontroller and my IP camera.[/caption]</p>

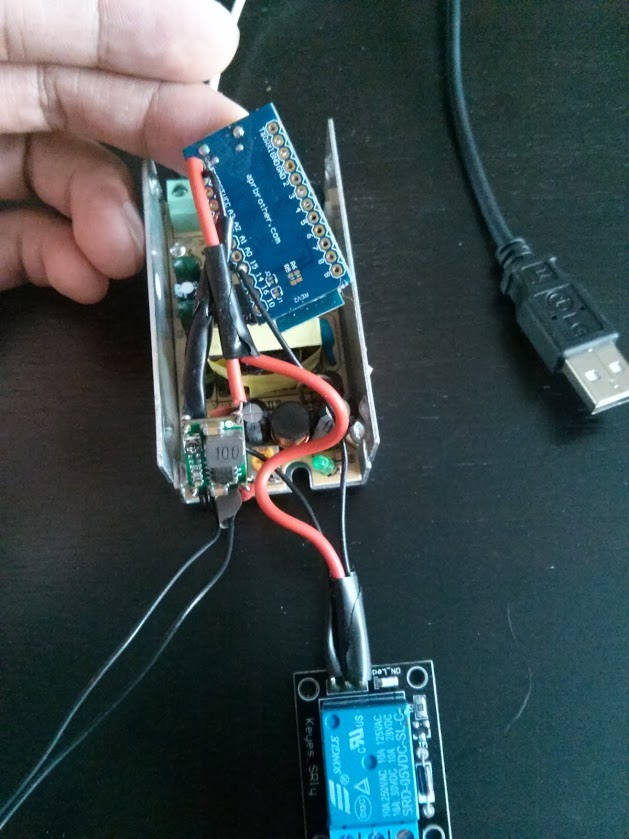
<p>The input of the power supply is 110/240VAC and the output is 12V DC. My IP Camera uses 12V DC, so it took the raw 12V DC. But the Cactus Micro and the Relay need lower voltage. So I used the DC-DC converter to step down 12V DC to 5V DC.</p>

<p>[caption id=”attachment_455” align=”alignnone” width=”629”]<a href="https://secretsciencelab.com/wp-content/uploads/2016/05/image-8.png"><img src="/assets/images/2016-05-08-diy-home-automation-almost-instant-response-wifi-smart-switch-for-16-with-mqtt/image-8.png" alt="Closer look at the DC bits" /></a> Closer look at the DC bits. The blue board I’m lifting up is the microcontroller that talks over WiFi and switches the relay. USB for scale.[/caption]</p>

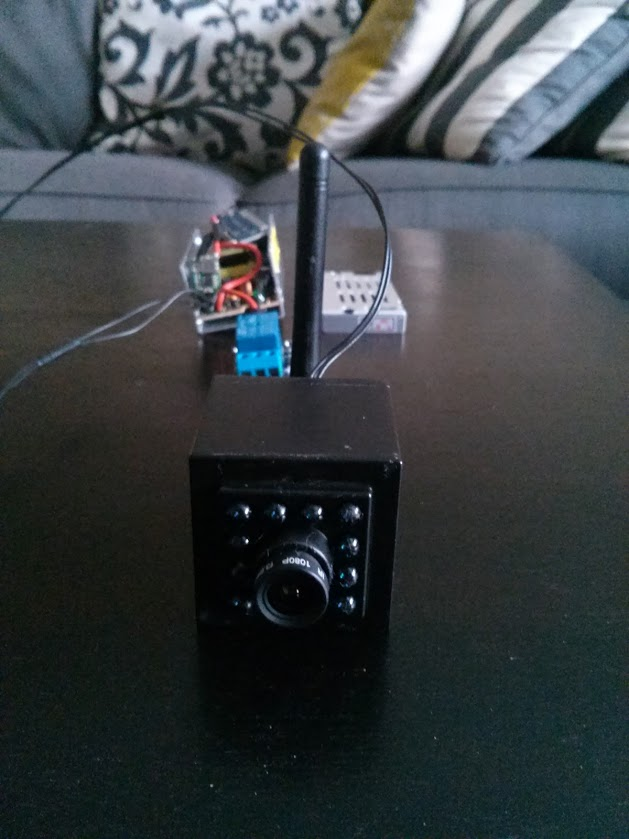
<p>[caption id=”attachment_456” align=”alignnone” width=”629”]<a href="https://secretsciencelab.com/wp-content/uploads/2016/05/image-7.png"><img src="/assets/images/2016-05-08-diy-home-automation-almost-instant-response-wifi-smart-switch-for-16-with-mqtt/image-7.png" alt="Closer look at my camera" /></a> Closer look at my camera[/caption]</p>

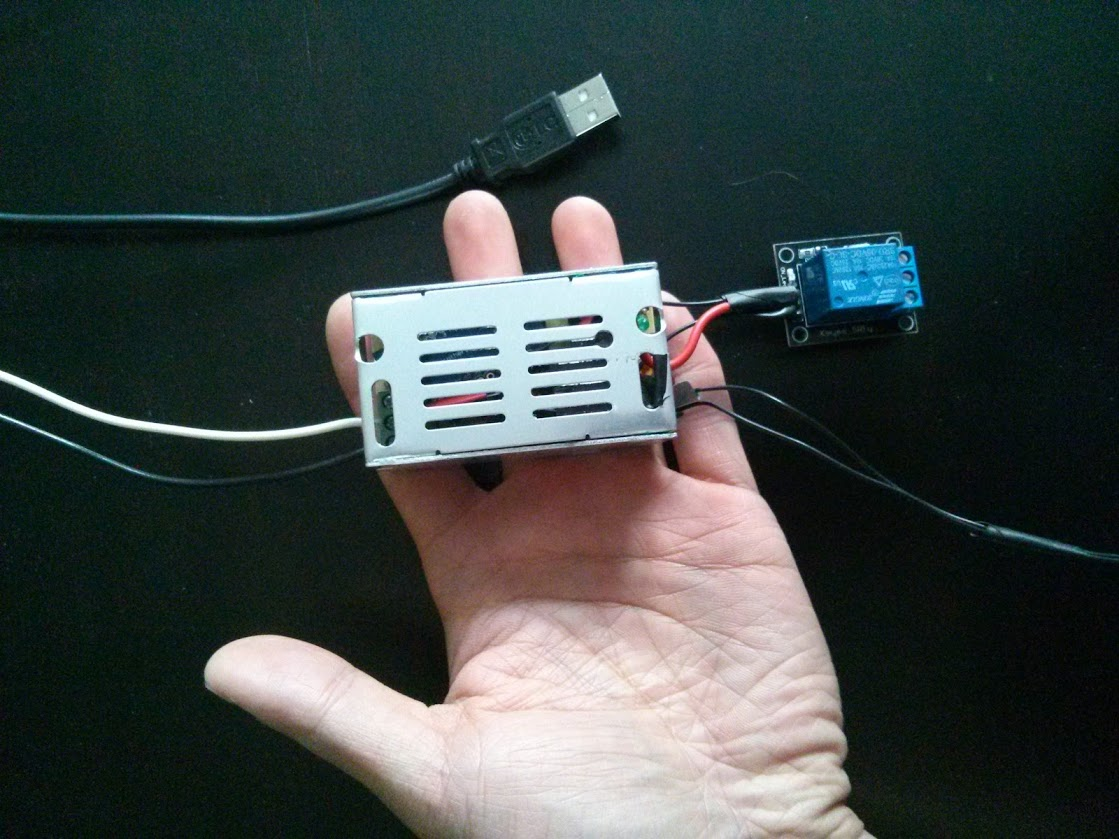
<p>[caption id=”attachment_454” align=”alignnone” width=”1000”]<a href="https://secretsciencelab.com/wp-content/uploads/2016/05/image-9.png"><img src="/assets/images/2016-05-08-diy-home-automation-almost-instant-response-wifi-smart-switch-for-16-with-mqtt/image-9-1024x768.png" alt="Closed up. Compact enough to fit into a wall conduit/switch box." /></a> Closed up. Compact enough to fit into a wall conduit/switch box.[/caption]</p>

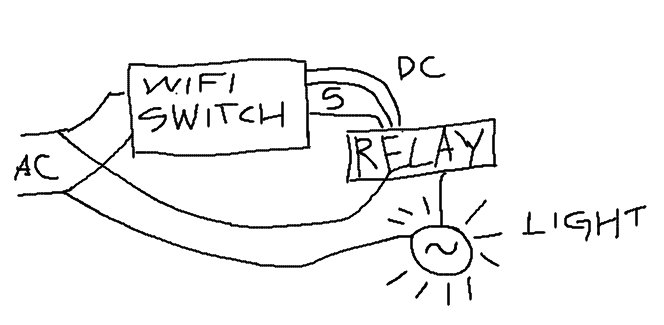
<p>And that’s the WiFi switch. Wire the switch up like this:</p>

<p>[caption id=”attachment_476” align=”alignnone” width=”664”]<a href="https://secretsciencelab.com/wp-content/uploads/2016/05/circuit.jpg"><img src="/assets/images/2016-05-08-diy-home-automation-almost-instant-response-wifi-smart-switch-for-16-with-mqtt/circuit.jpg" alt="Your WiFi switch controls your light or whatever AC load" /></a> Your WiFi switch can now control your light or whatever AC load you want up to 240V 10A[/caption]</p>

<p>The rest of the magic happens in software. There are 2 parts to the software. 1 part is the code you upload to the Arduino microcontroller. That connects to WiFi, listens for on/off commands and switches the relay. The 2nd part is what sends on/off commands to your smart switch.</p>

<p><strong>Software Part 1:</strong> Let’s set up your MQTT broker first. MQTT is the protocol that we’ll use to send commands to your Smart Switch and switch it on/off almost instantly. You can think of MQTT as an “IoT Twitter”. It lets your switch “subscribe” to a topic. Then something else can “publish” to that topic to turn it on/off. You need a MQTT broker because that’s what passes your messages between publisher and sender.</p>

<p>The easiest way to get a MQTT broker is to sign up for CloudMQTT’s free “Cute Cat” plan: <a href="https://www.cloudmqtt.com/plans.html">https://www.cloudmqtt.com/plans.html</a>. The 4 pieces of info you need after you set it up are: - Your broker’s hostname or IP address - Your broker’s port - Your broker’s user - Your broker’s password</p>

<p><strong>Software Part 2:</strong> Arduino code. I used a Cactus Micro, which has 2 chips in one package: an Arduino chip and an ESP8266 for WiFi. 1st step is to program the ESP8266 with <em><a href="https://github.com/AprilBrother/espduino">Espduino</a></em>. Espduino is an Arduino library that makes it easy to connect to WiFi and talk MQTT.</p>

<ol>
  <li>Set up your Cactus Micro arduino to flash the ESP8266’s firmware – upload this Arduino progrmamer sketch: <a href="http://wiki.aprbrother.com/wiki/How_to_made_Cactus_Micro_R2_as_ESP8266_programmer">http://wiki.aprbrother.com/wiki/How_to_made_Cactus_Micro_R2_as_ESP8266_programmer</a>.</li>
  <li>Flash the ESP8266 with the “espduino firmware”: <a href="https://github.com/AprilBrother/espduino/tree/master/esp8266/release">https://github.com/AprilBrother/espduino/tree/master/esp8266/release</a>. Use the <a href="https://github.com/nodemcu/nodemcu-flasher">NodeMCU Flasher</a> if you’re on Windows and the <a href="https://github.com/AprilBrother/esptool">esptool</a> if you’re on Linux.</li>
  <li>Upload the Arduino smartswitch sketch below to your Cactus Micro…</li>
</ol>

<p>IMPORTANT: Use Arduino IDE version 1.0.6. If you use version 1.0.5 your Cactus Micro will be unstable and randomly crash.</p>

<p>Disclaimer: The code below has a little more than the MQTT on/off stuff. I wanted to also show you how to sync time and also upload data to thingspeak.com. If you don’t need those, just delete them. I included them because I’ve found them useful in all my projects and they show you how you can upload/download regular HTTP via Espduino. I also included some bulletproofing code that reboots the ESP8266 if it malfunctions.</p>

<p><em>Replace all the “TODO_…” strings with your own info</em></p>

<div class="language-plaintext highlighter-rouge"><div class="highlight"><pre class="highlight"><code>#include 
#include 
#include 
#include 

#define MY_NAME "MY_SMARTSWITCH"
#define TS_KEY "TODO_THINGSPEAK_KEY"
#define MQTT_SERVER "TODO_MQTT_HOSTNAME_OR_IP"
#define MQTT_PORT TODO_MQTT_PORT
#define MQTT_USER "TODO_MQTT_USER"
#define MQTT_PASS "TODO_MQTT_PASS"
#define MQTT_ROOT_TOPIC "/homebot/switches"
#define ESP_PIN 13
#define RELAY_PIN 15
#define SSID "TODO_WIFI_SSID"
#define WIFIPW "TODO_WIFI_PASSWORD"

/*******************************************************
 * Wifi switch class
 *******************************************************/

#define ESP_REFRESH_THRESH 2
#define MAX_BUFSZ 300
char g_buf[MAX_BUFSZ];
int g_wifiStatus = 0; // 0=disconnected, 1=connecting, 2=OK

int g_switchCommand = 0;
unsigned long g_switchCommandTime = 0;
MQTT *g_mqtt = NULL;

void wifiCb(void* response)
{
  uint32_t status;
  RESPONSE res(response);

  if (res.getArgc() != 1)
    return;

  res.popArgs((uint8_t*)&amp;status, 4);
  if (status != STATION_GOT_IP) 
  {
    g_mqtt-&gt;disconnect();
    return;
  }
  
  Serial.println("WIFI CONNECTED");
  g_wifiStatus = 2;

  g_mqtt-&gt;connect(MQTT_SERVER, MQTT_PORT);
}

void mqttConnected(void* response)
{
  Serial.println("MQTT connected");
  sprintf(g_buf, "%s/%s/cmd", MQTT_ROOT_TOPIC, MY_NAME);
  g_mqtt-&gt;subscribe(g_buf); 
}
void mqttDisconnected(void* response) { }
void mqttData(void* response)
{
  if (timeStatus() == timeNotSet)
    return; // because we use now() below

  Serial.println("ARDUINO: recvd MQTT command...");
  RESPONSE res(response);

  String data = res.popString(); // topic
  Serial.println(data);

  data = res.popString(); // data
  Serial.println(data);

  g_switchCommandTime = now();
  if (data == "1")
    g_switchCommand = 1;
  else
    g_switchCommand = 0; // default to 'off'
}
void mqttPublished(void* response) { }

class WifiSwitch {
public:
  WifiSwitch() 
  : m_esp(&amp;Serial1, &amp;Serial, ESP_PIN),
    m_mqtt(&amp;m_esp),
    m_lastESPrefresh(0), m_lastClockSync(0), m_lastDataUpload(0),
    m_espWorkerIdx(0), m_needToRefreshESP(0)
  {
    g_mqtt = &amp;m_mqtt; // for callbacks
  }

  void setup() {
    pinMode(RELAY_PIN, OUTPUT);
    digitalWrite(RELAY_PIN, LOW); // disable relay
  }
  void loop() {
    /*******************************************
     * Do offline work
     *******************************************/

    /*******************************************
     * Do offline work that depends on Time
     *******************************************/

    if (timeStatus() != timeNotSet)
    {
      doCommand();
    }

    /*******************************************
     * Do online work
     *******************************************/

    if (refreshESP())
      return;

    m_esp.process();

    if (g_wifiStatus != 2)
      return; // can't do anything without wifi these days...

    if (m_espWorkerIdx == 0)
      syncClock();
    else if (m_espWorkerIdx == 1)
      uploadData();

    m_espWorkerIdx = (m_espWorkerIdx+1) % 2;
  }

  bool refreshESP() {
    if (!ESPneedsRefresh())
      return false;

    m_lastESPrefresh = millis();
    m_needToRefreshESP = 0;

    Serial.println("Reset ESP");
    g_wifiStatus = 1; // connecting

    m_mqtt.disconnect();

    m_esp.disable();
    delay(1000);
    m_esp.enable();
    delay(1000);
    m_esp.reset();
    delay(1000);

    int waitIter = 0;
    while (!m_esp.ready())
    {
      if (waitIter++ &gt; 10)
      {
        // ESP failed to come up
        // -- force hardware refresh
        m_needToRefreshESP = ESP_REFRESH_THRESH;
        return true;
      }
      Serial.println("Waiting for ESP...");
    }

    setupMQTT();

    setupWifi();

    Serial.println("ARDUINO: system online");

    return true;
  }

  bool restGet(char *host, char *path, char *buf, int sz) {
    REST rest(&amp;m_esp);

    if (!rest.begin(host)) {
      m_needToRefreshESP++;
      return false;
    }

    rest.get(path);

    memset(buf, 0, sz);

    if (rest.getResponse(buf, sz) != HTTP_STATUS_OK) {
      m_needToRefreshESP++;
      return false;
    }

    m_needToRefreshESP = 0;
    return true;
  }

  void uploadData() {
    if (!dataNeedsUpload())
      return;

    Serial.println("ARDUINO: upload to thingspeak...");

    m_lastDataUpload = millis();

    unsigned long uptimeMinutes = millis() / 1000 / 60;
    int ret = snprintf(g_buf, MAX_BUFSZ,
      "/update?key=%s&amp;field1=%d&amp;field2=%02d:%02d:%02d&amp;field3=%d&amp;field4=%lu",
      TS_KEY, weekday(), hour(), minute(), second(),
      g_switchCommand, uptimeMinutes
      );
    if (!(ret &gt; 0 &amp;&amp; ret &lt; MAX_BUFSZ))
      return; 

    //Serial.println(g_buf);

    if (restGet("api.thingspeak.com", g_buf, g_buf, MAX_BUFSZ-1))
    {
      Serial.println("RESPONSE: ");
      Serial.println(g_buf);
    }
  }

  void setupWifi() {
    Serial.println("ARDUINO: setup wifi");
    m_esp.wifiCb.attach(&amp;wifiCb);
    m_esp.wifiConnect(SSID, WIFIPW);
  }

  void setupMQTT() {
    Serial.println("ARDUINO: setup MQTT");
    if (!m_mqtt.begin(MY_NAME, MQTT_USER, MQTT_PASS, 120, 1))
      return; // failed to set up MQTT

    m_mqtt.lwt("/lwt", "offline", 0, 0);

    m_mqtt.connectedCb.attach(&amp;mqttConnected);
    m_mqtt.disconnectedCb.attach(&amp;mqttDisconnected);
    m_mqtt.publishedCb.attach(&amp;mqttPublished);
    m_mqtt.dataCb.attach(&amp;mqttData);
  }

  void syncClock() {
    if (!clockNeedsSync())
      return;

    Serial.println("ARDUINO: sync clock...");

    sprintf(g_buf, "%s", "/pdt/now.json?format=\\H%20\\M%20\\S%20\\d%20\\m%20\\y");
    //Serial.println(g_buf);

    if (!restGet("www.timeapi.org", g_buf, g_buf, MAX_BUFSZ-1))
      return;

    char *dateStr = strchr(g_buf, ':');
    if (dateStr == NULL)
      return;
    dateStr += 2;
    char *end = strchr(dateStr, '"');
    if (end == NULL)
      return;
    *end = '\0';

    Serial.println(dateStr);

    int H, M, S, d, m, y;
    int numRead = sscanf(dateStr, "%d %d %d %d %d %d", 
      &amp;H, &amp;M, &amp;S, &amp;d, &amp;m, &amp;y);
    if (numRead != 6)
      return;

    setTime(H, M, S, d, m, y);
    m_lastClockSync = millis();

    Serial.println("ARDUINO: clock synced!");
  }

  void doCommand() {
    unsigned long epochSecs = now();

    if (g_switchCommand == 1) 
      digitalWrite(RELAY_PIN, HIGH);
    else
      digitalWrite(RELAY_PIN, LOW);
  }

private:
  boolean clockNeedsSync() {
    if (timeStatus() == timeNotSet)
      return true;

    if (m_lastClockSync == 0)
      return true;

    if (millis() - m_lastClockSync &gt; 900000) // 15 mins
      return true;

    return false;
  }

  boolean dataNeedsUpload() {
    if (m_lastDataUpload == 0)
      return true;

    // thingspeak only lets 1 update through every 15 seconds
    if (millis() - m_lastDataUpload &gt; 16000)
      return true;

    return false;
  }

  boolean ESPneedsRefresh() {
    if (m_lastESPrefresh == 0)
      return true;

    if (millis() - m_lastESPrefresh &lt; 30000) // 1 min
    {
      // don't refresh too often 
      return false;
    }

    if (m_needToRefreshESP &gt;= ESP_REFRESH_THRESH)
      return true; // exceeded error thresh for refresh 

    if (g_wifiStatus != 2)
      return true; // couldn't connect wifi, reboot+retry

    return false;
  }

  ESP m_esp;
  MQTT m_mqtt;
  unsigned long m_lastDataUpload; // uses millis()
  unsigned long m_lastESPrefresh; // uses millis()
  unsigned long m_lastClockSync; // uses millis()
  int m_espWorkerIdx;
  int m_needToRefreshESP;
};

/*******************************************************
 * "Main"
 *******************************************************/

WifiSwitch mySwitch;

void setup() {
  Serial1.begin(19200); // don't change baud or...
  Serial.begin(19200);  // ... you'll get stuck 'Waiting for ESP'
  delay(10); // safety brick preventer
  mySwitch.setup();
}

void loop() {
  mySwitch.loop();
}

</code></pre></div></div>

<p>Once you have everything set up, you can power your switch and test it using the CloudMQTT “Websocket UI.” The code above subscribes your switch to the “/homebot/switches/MY_SMARTSWITCH/cmd” topic. Send a “1” over MQTT to turn it on. Send a “0” or whatever else to turn it off.</p>

<p>Here is mine in action: https://www.youtube.com/watch?v=PnbewXYqUOE</p>

<p>Happy switching!</p>

<p>P.S. If you get stuck or have any questions, email me at aaron@secretsciencelab.com</p>

<p>P.P.S Please don’t die by being stupid with electricity. Actually it’s probably best if you don’t try this project.</p>]]></content><author><name></name></author><category term="robots" /><category term="110v" /><category term="acdc" /><category term="arduino" /><category term="cactus-micro" /><category term="cloudmqtt" /><category term="espduino" /><category term="mqtt" /><category term="nodemcu" /><category term="relay" /><category term="smart-switch" /><category term="smartswitch" /><category term="wifi-switch" /><summary type="html"><![CDATA[Parts list:]]></summary></entry><entry><title type="html">“Sprinkler Brain” - Cactus Micro Arduino Wi-Fi multi-zone Smart Sprinklers (DIY for under $20)</title><link href="/robots/2015/11/05/sprinkler-brain-cactus-micro-arduino-wi-fi-multi-zone-smart-sprinklers-diy-for-under-20.html" rel="alternate" type="text/html" title="“Sprinkler Brain” - Cactus Micro Arduino Wi-Fi multi-zone Smart Sprinklers (DIY for under $20)" /><published>2015-11-05T00:00:00+00:00</published><updated>2015-11-05T00:00:00+00:00</updated><id>/robots/2015/11/05/sprinkler-brain-cactus-micro-arduino-wi-fi-multi-zone-smart-sprinklers-diy-for-under-20</id><content type="html" xml:base="/robots/2015/11/05/sprinkler-brain-cactus-micro-arduino-wi-fi-multi-zone-smart-sprinklers-diy-for-under-20.html"><![CDATA[<p>In some parts of the world, water usage is serious business. For example, there is a drought in California. If you live here, you know that they want you to water your lawn only twice a week. And if they catch you using too much water, they slap you with a higher rate for being a water pig. So water is serious business. But you love your garden and vegetables and trees and such. And they need water. So what can you do?</p>

<p>To be honest, I’m struggling to figure that out myself. My neighbor is getting hip with lush succulents that barely need any water. I might go that route too, but even if you do, you still need to be smart about your water. In fact, as you sprinkle more diverse plants around your landscape, watering might get more complicated since different plants need different amounts of water. And the first step to optimizing water usage is being able to CONTROL water flow from a computer program. On, off. Once we can do that, you can smart it up any which way to optimize when to switch sprinklers on or off. So that’s the main goal of this write-up – to show you how to set up a cheap and bulletproof base rig to programmatically switch your sprinklers.</p>

<p>But since we’re building, how about we make a wishlist of all the things we can do better than grandpa’s garage wall sprinkler controller:</p>

<ul>
  <li>Program sprinkler schedule from anywhere, without going to the wall unit</li>
  <li>Never lose your programs when you lose power or forget to replace the backup battery</li>
  <li>Automatically skip sprinkling when it rains</li>
  <li>Measure how much water each sprinkler zone uses</li>
  <li>Never have to physically be at the wall unit to turn it on or off</li>
  <li>Must be able to manually turn individual sprinklers on and off from your phone, when you want to test and fix sprinklers around the yard</li>
  <li>Must be able to spray your kids/neighbors/dog/squirrels with the tap of your finger, from the comfort of your armchair</li>
  <li>Etc.</li>
</ul>

<p>Parts list:</p>

<ul>
  <li><a href="http://www.aliexpress.com/item/Cactus-Micro-compatible-board-plus-WIFI-chip-esp8266-for-atmega32u4/32308358010.html">Cactus Micro Arduino+ESP8266 combo microcontroller</a> (get the Revision 2 one) - $10</li>
  <li><a href="http://www.ebay.com/sch/i.html?_nkw=8+Channel+Relay+Module+With+optocoupler+Fr+PIC+AVR+DSP+ARM+Arduino+5V">5V 8-channel relay with optocoupler</a> - $5</li>
  <li><a href="http://www.ebay.com/sch/i.html?_nkw=Converter+Step+Down+Module+Power+Supply+24V+12V+AC%2FDC+Output+DC+1.5V-27V+buck">AC/DC Buck Converter</a> - to convert 24V AC to 5V DC - $2</li>
  <li><a href="http://www.ebay.com/sch/i.html?_nkw=tip122">TIP122 NPN Darlington Transistor</a> - $0.14</li>
</ul>

<p>Total: $17.14</p>

<p>Now here’s what we’ll be building…</p>

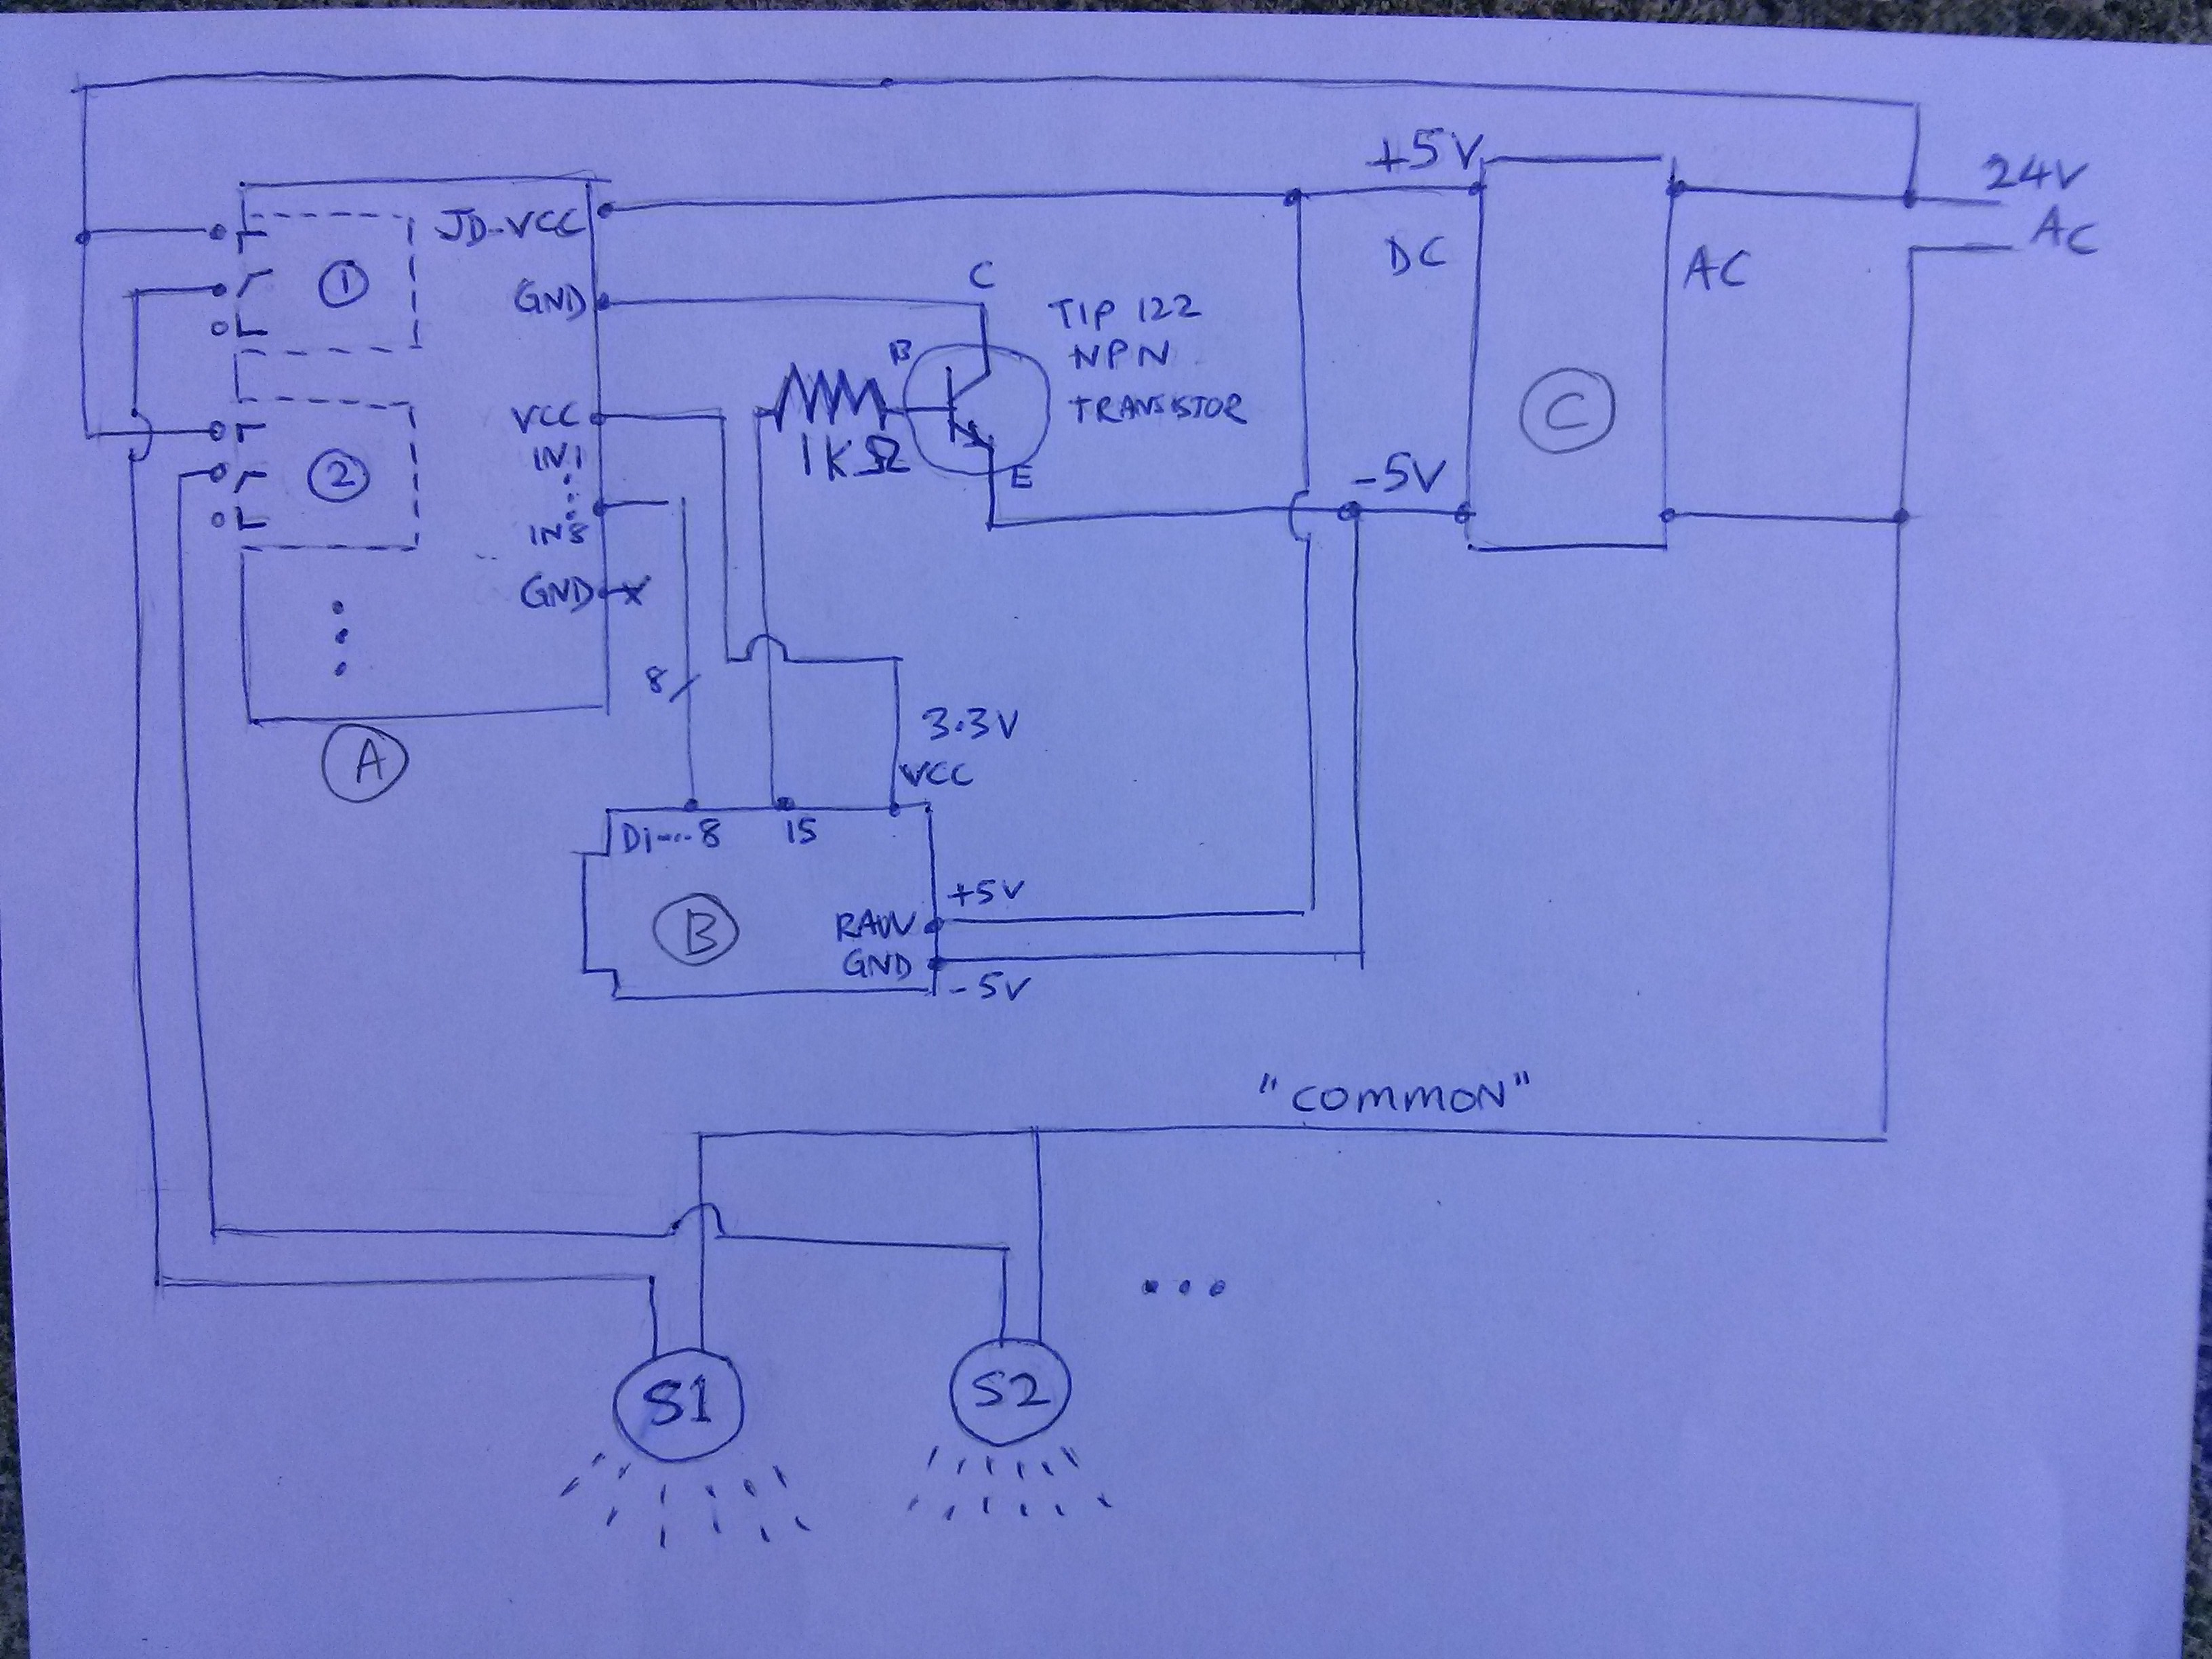
<p>[caption id=”attachment_425” align=”alignnone” width=”1000”]<a href="https://secretsciencelab.com/wp-content/uploads/2015/11/sprinklerSchematic.jpg"><img src="/assets/images/2015-11-05-sprinkler-brain-cactus-micro-arduino-wi-fi-multi-zone-smart-sprinklers-diy-for-under-20/sprinklerSchematic-1024x768.jpg" alt="The secret plans" /></a> My secret schematic. <em>Disclaimer: use at your own risk, I’m not responsible for death or damages, don’t play with electricity, etc etc</em>[/caption]</p>

<p>S1 and S2 at the bottom are your sprinklers. 24 AC on the right is the standard power supply for your sprinkler valves. Block (A) on the left is the 8-channel relay. Block (B) in the middle-ish is the Cactus Micro microcontroller. Block (C) is the AC/DC converter to tap 24V AC from the standard sprinkler circuit and convert it to 5V DC for our control circuit.</p>

<p>At this point you might be wondering why is there a transistor in the middle of the schematic, if we already have a relay. Well, you don’t need it. But I put it in there as a safety feature. Remember how water is serious business? I figured that I’m okay if my chip malfunctions and it doesn’t turn on the water. But what’s worse is if it malfunctions and the water gets stuck OPEN and floods the yard and the sidewalk and the street and neighbors while I’m away. That would be an expensive disaster.</p>

<p>The possibility crossed my mind because I fried one of my Cactus Micro pins while soldering the headers, and it got stuck and pulled one relay open. Had that relay been connected to a sprinkler, and had that sprinkler locked open while I wasn’t home, I would have returned to a $1000 water bill before I could shut it off.</p>

<p>So that’s why I added that extra transistor switch. (I would have added 5 more safety mechanisms if I had the patience.) It functions like a <a href="https://en.wikipedia.org/wiki/Two-man_rule">Two-man rule</a> control. Like when they needed two keys to arm the nuclear missile in the Hunt for Red October. You can see that the transistor guards the power supply of the relay. What this means is that TWO things have to work to open a sprinkler relay: 1) an “open” signal from the Cactus Micro microcontroller D1-D8 pins to the relay’s IN1-IN8 pins 2) an “enable” signal from the Cactus Micro’s D15 pin to the transistor</p>

<p>This way, two pins have to fail for the relay to be stuck open – which is still possible – but less likely than one pin failing. Can’t be too sure.</p>

<p>OK. Now we build. First, prepare the Cactus Micro. The original firmware is garbage. We want to replace it with espduino. Espduino gives you rock-solid WiFi and lets you work like a civilized person via a REST API, not a caveman via serial commands.</p>

<p>Follow instructions in the 2 links below. First upload the Arduino sketch to configure the Cactus as a serial programmer. Then flash the ESP8266 firmware through the Cactus host board. <a href="http://wiki.aprbrother.com/wiki/How_to_made_Cactus_Micro_R2_as_ESP8266_programmer">http://wiki.aprbrother.com/wiki/How_to_made_Cactus_Micro_R2_as_ESP8266_programmer</a> <a href="https://github.com/tuanpmt/espduino">https://github.com/tuanpmt/espduino</a></p>

<p>After the espduino firmware is on the ESP8266, replace the “serial programmer” sketch above with our real “Sprinkler Brain” sketch below:</p>

<div class="language-plaintext highlighter-rouge"><div class="highlight"><pre class="highlight"><code>#include   
#include 
#include 

#define MY_NAME "THING_1"
// THING_1
#define TS_KEY "ABC123" 
#define SSLAB_KEY "123ABC"
// hygrometer analog input
#define SPRINKLER_START_PIN 3
#define ESP_PIN 13
#define HYGRO_PIN 18
#define RELAY_PIN 15
#define TEST_SCHEDULE_MODE 0

/*******************************************************
 * MinuteMap class
 *******************************************************/

const char g_b64alpha[] = "ABCDEFGHIJKLMNOPQRSTUVWXYZabcdefghijklmnopqrstuvwxyz0123456789+/";

class MinuteMap {
public:
  MinuteMap() {
    reset();
  }
  void setHourMin(byte hour, byte minStart, byte minStop)
  // set minuteMap bits [minStart, minStop)
  {
    if (minStart % 2 != 0)
      minStart -= 1; // snap down to 2 min range
    if (minStop % 2 != 0)
      minStop += 1; // snap up to 2 min range

    minStart = max(minStart, 0);
    minStop = max(minStart, minStop);

    byte mmBaseIdx = hour*32;
    byte mmStartIdx = mmBaseIdx + minute2mmIdx(minStart);
    byte mmStopIdx = mmBaseIdx + minute2mmIdx(minStop);

    for (byte i=mmStartIdx; i &lt; mmStopIdx; i++)
      setMinuteMapBit(i);
  }
  void setMinuteMapBit(byte idx)
  {
    byte mmHourIdx = idx / 32;
    byte remainder = idx % 32;
    long bit = 1UL &lt;&lt; remainder;
    m_minuteMap[mmHourIdx] |= bit;
  }
  bool isHourMinSet(byte hour, byte min)
  {
    byte mmIdx = minute2mmIdx(min);
    long bit = 1UL &lt;&lt; mmIdx;
    return m_minuteMap[hour] &amp; bit;
  }
#if 0
  void printMinuteMap()
  {
    char mmBits[70];
    memset(mmBits, 0, sizeof(mmBits));

    byte mmBitsIdx = 0;
    for (byte i=0; i &lt; 2; i++)
      for (byte j=0; j &lt; 32; j++)
      {
        long bit = 1UL &lt;&lt; j;
        if (m_minuteMap[i] &amp; bit)
          mmBits[mmBitsIdx++] = '1';
        else
          mmBits[mmBitsIdx++] = '0';
      }

    Serial.println(mmBits);
  }
#endif
  void reset() 
  {
    m_minuteMap[0] = m_minuteMap[1] = 0;
  }
  void setWithBase64code(const char *b64code)
  {
    reset();
    byte mmIdx = 0;
    const int codeLen = strlen(b64code);
    for (int i=0; i &lt; codeLen; i++)
    {
      byte c = b64code[i];
      byte val = getBase64letterVal(c);
      if (val == 255)
        continue; // bad letter

      // scan bits of base64 lettter
      // and set bits in minuteMap
      for (byte b=0; b &lt; 6; b++, mmIdx++)
        if (val &amp; (1UL &lt;&lt; b))
          setMinuteMapBit(mmIdx);
    }
  }
  byte getBase64letterVal(char c) 
  {
    for (byte val=0; val &lt; 64; val++)
      if (g_b64alpha[val] == c)
        return val;
    
    return 255;
  }
  void getMinuteMapBase64code(char *code)
  // Note: code buf needs to be large enough; I'm not checking sizes
  {
    byte codeIdx = 0;

    /*
     * Iterate through the 32+32 bits that represent
     * the minute intervals in the 2 hours we're tracking.
     * Convert each 6-bit chunk into a base64 letter.
     */
    byte b64letterVal = 0;
    byte b64bitIdx = 0;
    for (byte i=0; i &lt; 2; i++)
      for (byte j=0; j &lt; 32; j++)
      {
        long bit = 1UL &lt;&lt; j;
        if (m_minuteMap[i] &amp; bit)
          b64letterVal |= 1 &lt;&lt; b64bitIdx;

        b64bitIdx = (b64bitIdx+1) % 6;

        if (b64bitIdx == 0)
        {
          // we've visted 6 bits 
          // -- output the completed base64 letter
          code[codeIdx++] = g_b64alpha[b64letterVal];
          b64letterVal = 0; // reset
        }
      }

    if (b64bitIdx != 0)
    {
      // output final base64 letter
      code[codeIdx++] = g_b64alpha[b64letterVal];
    }

    code[codeIdx] = '\0'; // NULL-terminate string
  }

  byte minute2mmIdx(byte minute)
  // [0,60) -&gt; [0, 32)
  {
    byte quadrant = minute / 15;
    byte idx = quadrant * 8; // we use 8 bits to track every 15 minutes

    byte remainMins = minute % 15;
    idx += remainMins / 2; // we use 1 bit to track 2-minute slots

    return idx;
  }

private:
  long m_minuteMap[2]; // 2 x 32 bits 
                       // = 2-minute chunks over 2 hours 
};

/*******************************************************
 * SprinklerBrain class
 *******************************************************/

#define NUM_SPRINKLER_CHANNELS 8
#define ESP_REFRESH_THRESH 2
#define MAX_BUFSZ 300
char g_buf[MAX_BUFSZ];
char g_sprinklerStr[NUM_SPRINKLER_CHANNELS+1];
boolean g_isWifiConnected = false;

void wifiCb(void* response)
{
  uint32_t status;
  RESPONSE res(response);

  if (res.getArgc() != 1)
    return;

  res.popArgs((uint8_t*)&amp;status, 4);
  if (status != STATION_GOT_IP) 
    return;
  
  Serial.println("WIFI CONNECTED");
  g_isWifiConnected = true;
}

class SprinklerBrain {
public:
  SprinklerBrain() 
  : m_esp(&amp;Serial1, &amp;Serial, ESP_PIN),
    m_lastClockSync(0), m_lastDataUpload(0),
    m_lastESPrefresh(0), m_lastHygroRead(0), 
    m_lastCommandsFetch(0), m_sprinklerCommandTime(0),
    m_needToRefreshESP(0), m_hygroVal(0)
  {
    for (byte i=0; i &lt; NUM_SPRINKLER_CHANNELS; i++)
    {
      m_sprinklerState[i] = false;
      m_sprinklerCommand[i] = '-'; // default to auto
    }
  }

  void setup() {
    pinMode(RELAY_PIN, OUTPUT);
    digitalWrite(RELAY_PIN, LOW); // disable relay

    for (byte i=0; i &lt; NUM_SPRINKLER_CHANNELS; i++)
    {
      pinMode(SPRINKLER_START_PIN+i, OUTPUT); // sets the digital pin as output
      digitalWrite(SPRINKLER_START_PIN+i, HIGH); // this relay uses reverse logic!
    }

    /* 
     * Set Sprinklers
     * Zone A (Mon &amp; Thu, 10.30pm)
     * 1 12
     * 2 15
     * 3 18
     * 4 18
     * 
     * Zone B (Mon &amp; Thu, 11pm)
     * 5 14
     * 6 8
     * 7 12
     */
    // Zone A
    m_minuteMap[0].setHourMin(0, 0, 12);  // 12 mins
    m_minuteMap[1].setHourMin(0, 12, 28); // 16 mins
    m_minuteMap[2].setHourMin(0, 28, 46); // 18 mins
    m_minuteMap[3].setHourMin(0, 46, 60); // 14 mins
    m_minuteMap[3].setHourMin(1, 0, 4);   // +4 mins
    // Zone B
    m_minuteMap[4].setHourMin(1, 4, 18);  // 14 mins
    m_minuteMap[5].setHourMin(1, 18, 26); // 8 mins
    m_minuteMap[6].setHourMin(1, 26, 38); // 12 mins
  }
  void loop() {
    /*******************************************
     * Do offline work
     *******************************************/

    readHygro();

    /*******************************************
     * Do offline work that depends on Time
     *******************************************/

    if (timeStatus() != timeNotSet)
    {
      doSprinkle();
    }

    /*******************************************
     * Do online work
     *******************************************/

    if (refreshESP())
      return;

    m_esp.process();

    if (!g_isWifiConnected)
      return; // can't do anything without wifi these days...

    syncClock();

    fetchCommands();

    uploadData();
  }

  bool refreshESP() {
    if (!ESPneedsRefresh())
      return false;

    m_lastESPrefresh = millis();
    m_needToRefreshESP = 0;

    Serial.println("Reset ESP");
    g_isWifiConnected = false;

    m_esp.disable();
    delay(500);
    m_esp.enable();
    delay(500);
    m_esp.reset();
    delay(500);

    int waitIter = 0;
    while (!m_esp.ready())
    {
      if (waitIter++ &gt; 20)
      {
        // ESP failed to come up
        // -- force hardware refresh
        m_needToRefreshESP = ESP_REFRESH_THRESH;
        return true;
      }
      Serial.println("Waiting for ESP...");
    }

    setupWifi();

    Serial.println("ARDUINO: system online");

    return true;
  }

  bool restGet(char *host, char *path, char *buf, int sz) {
    REST rest(&amp;m_esp);

    if (!rest.begin(host)) {
      m_needToRefreshESP++;
      return false;
    }

    rest.get(path);

    memset(buf, 0, sz);

    if (rest.getResponse(buf, sz) != HTTP_STATUS_OK) {
      m_needToRefreshESP++;
      return false;
    }

    m_needToRefreshESP = 0;
    return true;
  }

  void uploadData() {
    if (!dataNeedsUpload())
      return;

    Serial.println("ARDUINO: upload to thingspeak...");

    m_lastDataUpload = millis();

    g_sprinklerStr[NUM_SPRINKLER_CHANNELS] = '\0';
    for (byte i=0; i &lt; NUM_SPRINKLER_CHANNELS; i++)
      g_sprinklerStr[i] = (m_sprinklerState[i])? '1' : '-';

    int ret = snprintf(g_buf, MAX_BUFSZ,
      "/update?key=%s&amp;field1=%s&amp;field2=%d&amp;field3=%02d:%02d:%02d&amp;field4=%d&amp;field5=%s&amp;field6=%d&amp;field7=",
      TS_KEY, MY_NAME, 
      weekday(), hour(), minute(), second(), 
      m_hygroVal, g_sprinklerStr, m_needToRefreshESP);
    if (!(ret &gt; 0 &amp;&amp; ret &lt; MAX_BUFSZ))
      return; 

    // append sprinkler schedule to last field
    for (byte i=0; i &lt; NUM_SPRINKLER_CHANNELS; i++)
    {
      if (strlen(g_buf) &gt; MAX_BUFSZ - 14)
        break;

      if (i &gt; 0)
        *(g_buf + strlen(g_buf)) = ',';

      m_minuteMap[i].getMinuteMapBase64code(g_buf + strlen(g_buf));
    }

    //Serial.println(g_buf);

    if (restGet("api.thingspeak.com", g_buf, g_buf, MAX_BUFSZ))
    {
      Serial.println("RESPONSE: ");
      Serial.println(g_buf);
    }
  }

  void fetchCommands() {
    if (!commandsNeedRefresh())
      return;

    Serial.println("ARDUINO: fetching commands...");

    m_lastCommandsFetch = millis();

    sprintf(g_buf, "/homebot/sprinklers/command?key=%s", 
      SSLAB_KEY);

    if (!restGet("secretsciencelab.appspot.com", g_buf, g_buf, MAX_BUFSZ))
      return;

    char *firstDelim = strchr(g_buf, ';');
    if (firstDelim == NULL)
      return; // no command

    Serial.println(g_buf);

    char *timeStr = g_buf;
    char *cmdStr = firstDelim+1;
    *firstDelim = '\0';

    m_sprinklerCommandTime = atol(timeStr);

    for (int i=0; i &lt; NUM_SPRINKLER_CHANNELS; i++)
      m_sprinklerCommand[i] = '-'; // default to 'auto'

    int cmdLen = strlen(cmdStr);
    for (int i=0; i &lt; cmdLen &amp;&amp; i &lt; NUM_SPRINKLER_CHANNELS; i++)
      m_sprinklerCommand[i] = cmdStr[i];
  }

  void readHygro() {
    if (!hygroNeedsRead())
      return;

    m_lastHygroRead = millis();

    // http://www.xuru.org/rt/PR.asp
    m_hygroVal = analogRead(HYGRO_PIN);

    //Serial.println("Hygro reading: ");
    //Serial.println(m_hygroVal);
  }

  void setupWifi() {
    Serial.println("ARDUINO: setup wifi");
    m_esp.wifiCb.attach(&amp;wifiCb);
    m_esp.wifiConnect("Anomalocaris","gp3gh0ddxf");
  }

  void syncClock() {
    if (!clockNeedsSync())
      return;

    Serial.println("ARDUINO: sync clock...");

    sprintf(g_buf, "%s", "/pdt/now.json?format=\\H%20\\M%20\\S%20\\d%20\\m%20\\y");
    //Serial.println(g_buf);

    if (!restGet("www.timeapi.org", g_buf, g_buf, MAX_BUFSZ-1))
      return;

    char *dateStr = strchr(g_buf, ':');
    if (dateStr == NULL)
      return;
    dateStr += 2;
    char *end = strchr(dateStr, '"');
    if (end == NULL)
      return;
    *end = '\0';

    Serial.println(dateStr);

    int H, M, S, d, m, y;
    byte numRead = sscanf(dateStr, "%d %d %d %d %d %d", &amp;H, &amp;M, &amp;S, &amp;d, &amp;m, &amp;y);
    if (numRead != 6)
      return;

    setTime(H, M, S, d, m, y);
    m_lastClockSync = millis();

    Serial.println("ARDUINO: clock synced!");
    m_needToRefreshESP = 0; 
  }

  void doSprinkle() {
    boolean isInScheduleWindow = false;
    #if TEST_SCHEDULE_MODE == 1
      isInScheduleWindow = true;
    #else
      if ((weekday() == 2 || weekday() == 5) // Mon/Thu
        &amp;&amp; (hour() == 22 || hour() == 23)) // 10pm/11pm
        isInScheduleWindow = true; 
    #endif

    byte myHour = hour() % 2; 
    byte myMin = minute(); 

    // init sprinkler states to OFF
    memset(m_sprinklerState, 0, sizeof(m_sprinklerState));

    // check if we have manual "on" request
    int manualOn = -1;
    for (byte i=0; i &lt; NUM_SPRINKLER_CHANNELS &amp;&amp; manualOn &lt; 0; i++)
      if (m_sprinklerCommand[i] == '1')
        manualOn = i;

    time_t epochSecs = now(); // unsigned long in 
    if (manualOn &gt;= 0 
      &amp;&amp; m_sprinklerCommandTime &lt; epochSecs 
      &amp;&amp; epochSecs - m_sprinklerCommandTime &lt; 300)
    {
      // allow one sprinkler to be forced on... but only for up to 5 mins
      m_sprinklerState[manualOn] = true;
    }
    else if (isInScheduleWindow)
    {
      // process MinuteMap to set sprinkler states
      for (byte i=0; i &lt; NUM_SPRINKLER_CHANNELS; i++)
        if (m_minuteMap[i].isHourMinSet(myHour, myMin)
          &amp;&amp; m_sprinklerCommand[i] != '0')
          m_sprinklerState[i] = true;
    }

    // process sprinkler states to switch sprinklers on/off
    boolean enableRelay = false;
    for (byte i=0; i &lt; NUM_SPRINKLER_CHANNELS; i++)
      if (m_sprinklerState[i])
      {
        enableRelay = true;
        digitalWrite(SPRINKLER_START_PIN+i, LOW);
      }
      else
        digitalWrite(SPRINKLER_START_PIN+i, HIGH);

    // "two-man rule" switch to minimize "on" faults
    // turning on water is serious business!
    if (enableRelay)
      digitalWrite(RELAY_PIN, HIGH);
    else
      digitalWrite(RELAY_PIN, LOW);
  }

private:
  boolean clockNeedsSync() {
    if (timeStatus() == timeNotSet)
      return true;

    if (m_lastClockSync == 0)
      return true;

    if (hour() &gt; 20 || hour() &lt; 2)
    {
      // don't sync during operation window
      return false;
    }

    if (millis() - m_lastClockSync &gt; 900000) // 15 mins
      return true;

    return false;
  }

  boolean dataNeedsUpload() {
    if (m_lastDataUpload == 0)
      return true;

    // thingspeak only lets 1 update through every 15 seconds
    if (millis() - m_lastDataUpload &gt; 16000)
      return true;

    return false;
  }

  boolean commandsNeedRefresh() {
    if (m_lastCommandsFetch == 0)
      return true;

    // FIXME: increase the period? 
    // we don't need such heavy polling for responsiveness
    if (millis() - m_lastCommandsFetch &gt; 15000) // 15s
      return true;

    return false;
  }

  boolean ESPneedsRefresh() {
    if (m_lastESPrefresh == 0)
      return true;

    if (millis() - m_lastESPrefresh &lt; 120000) // 2 minutes
    {
      // don't refresh too often 
      return false;
    }

    if (m_needToRefreshESP &gt;= ESP_REFRESH_THRESH)
      return true; // exceeded error thresh for refresh 

    if (!g_isWifiConnected)
      return true; // couldn't connect wifi, reboot+retry

    return false;
  }

  boolean hygroNeedsRead() {
    if (m_lastHygroRead == 0)
      return true;

    if (millis() - m_lastHygroRead &gt; 5000) // 5 seconds
      return true;

    return false;
  }

  ESP m_esp;
  unsigned long m_lastClockSync; // uses millis()
  unsigned long m_lastDataUpload; // uses millis()
  unsigned long m_lastESPrefresh; // uses millis()
  unsigned long m_lastHygroRead; // uses millis()
  unsigned long m_lastCommandsFetch; // uses millis()
  byte m_needToRefreshESP;

  MinuteMap m_minuteMap[NUM_SPRINKLER_CHANNELS];
  boolean m_sprinklerState[NUM_SPRINKLER_CHANNELS];
  char m_sprinklerCommand[NUM_SPRINKLER_CHANNELS];
  time_t m_sprinklerCommandTime;
  int m_hygroVal;
};

/*******************************************************
 * "Main"
 *******************************************************/

SprinklerBrain brain;

void setup() {
  Serial1.begin(19200);
  Serial.begin(19200);
  delay(10); // safety brick preventer
  brain.setup();
}

void loop() {
  brain.loop();
}

</code></pre></div></div>

<p>Some noteworthy bits in the sketch above: - syncClock() syncs the time on your Cactus Micro with timeapi.org every 15 minutes - readHygro() is an example of how you might add a sensor to your system - fetchCommands() fetches commands from my “cloud” mothership (in the form of a string like</p>

<div class="language-plaintext highlighter-rouge"><div class="highlight"><pre class="highlight"><code>'1----0-'
</code></pre></div></div>

<p>where 1 is force on, 0 is force off, - is follow program). - uploadData() pushes Cactus data/state to <a href="http://community.thingspeak.com/documentation/api/">thingspeak.com</a> servers. I use this thingspeak data stream to render my smartphone “app” UI - restGet() is the wrapper function I use to make HTTP REST calls. It counts errors so that if I see too many consecutive ESP8266 errors, I can power-cycle the ESP8266. - <a href="https://github.com/secretsciencelab/minutemap">MinuteMap</a> is the compact data structure I use to store my sprinkler schedule - The Time.h Arduino library is from <a href="http://www.pjrc.com/teensy/td_libs_Time.html">here</a></p>

<p>I set up my “server” on Google App Engine. It’s awesome and Google gives you a very generous free daily quota. Unlike Amazon’s EC2 which rails you with no lube and annoying bills even if you do something innocent like leave one terminal connected to your instance. With Google App Engine, I have never needed more than the free daily quota, even with my many projects bashing one app.</p>

<p>(Email me at aaron@secretsciencelab.com if you want my AppEngine code. I didn’t have time to carve it out and clean it up to post here)</p>
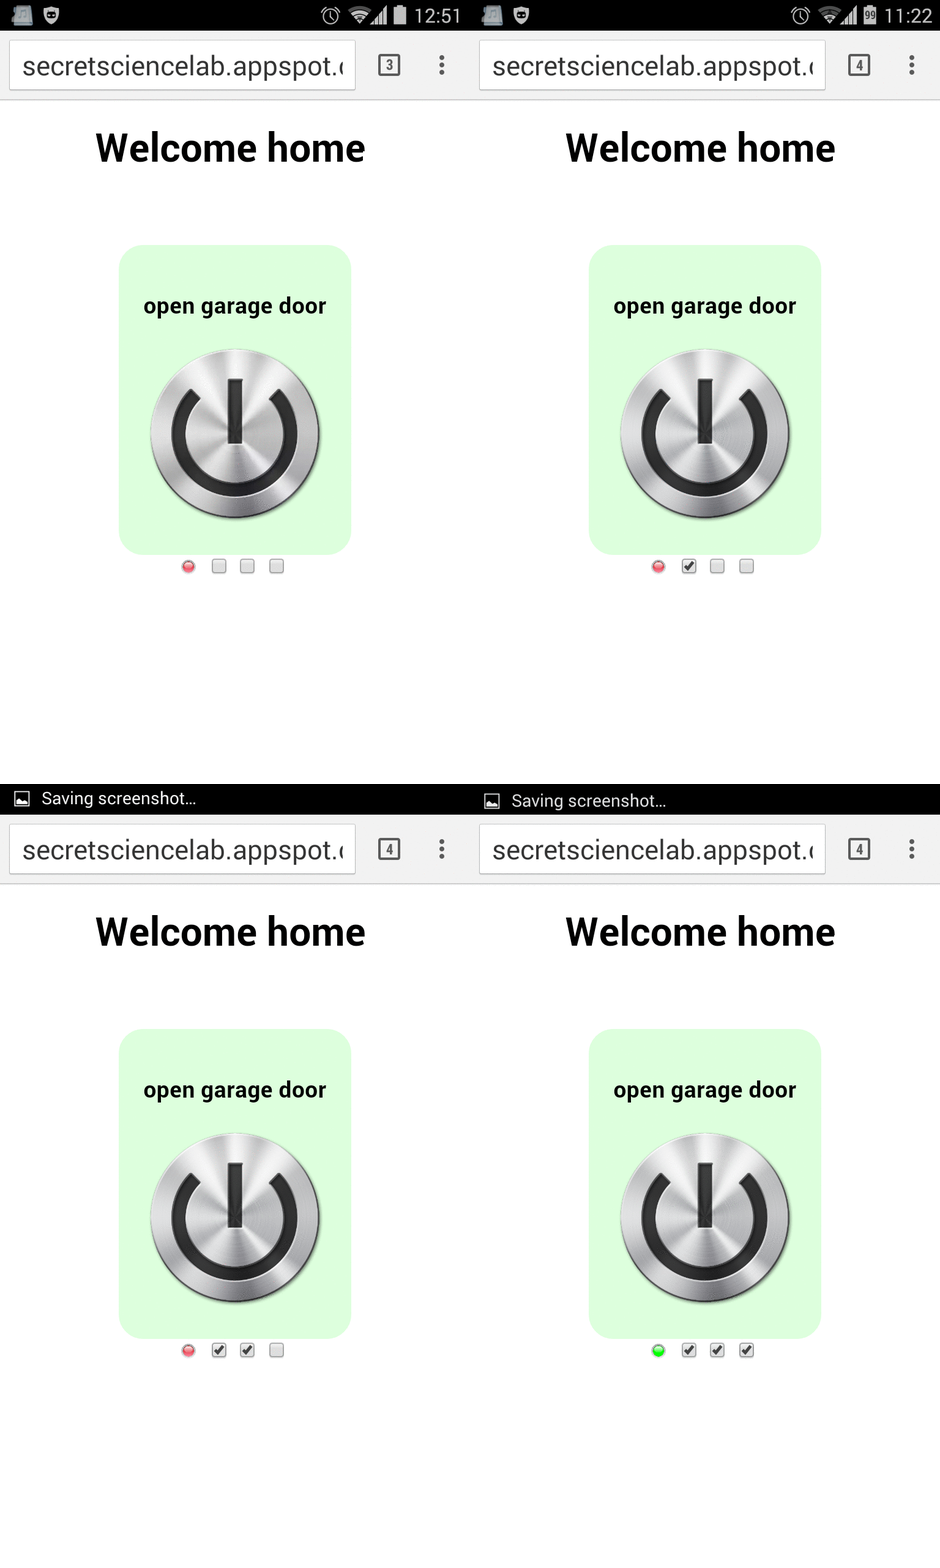
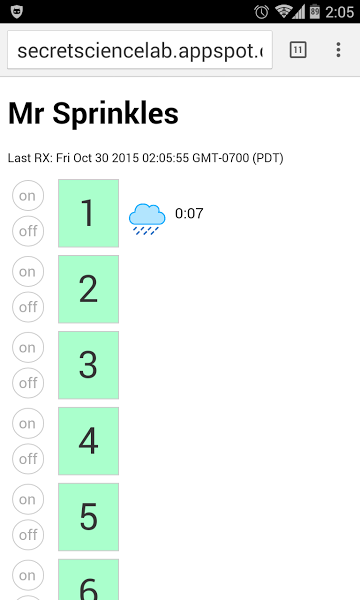
<p>Then I made a simple web app UI which serves 2 purposes: 1) manually turn sprinklers on/off to impress friends 2) monitor the sprinklers in action and to make sure it’s working</p>

<p>[caption id=”attachment_410” align=”alignnone” width=”360”]<a href="https://secretsciencelab.com/wp-content/uploads/2015/11/appScreenshot.png"><img src="/assets/images/2015-11-05-sprinkler-brain-cactus-micro-arduino-wi-fi-multi-zone-smart-sprinklers-diy-for-under-20/appScreenshot.png" alt="Here we can see that Sprinkler Channel 1 is running and it has 7 mins left on its schedule" /></a> Here we can see that Sprinkler Channel 1 is running and it has 7 mins left on its schedule. I can tap the on/off buttons on the left to manually override the schedule.[/caption]</p>

<p>(Email me at aaron@secretsciencelab.com if you want my HTML/Javascript web app code. I’m happy to share, just too lazy right now to package it nicely to post here)</p>
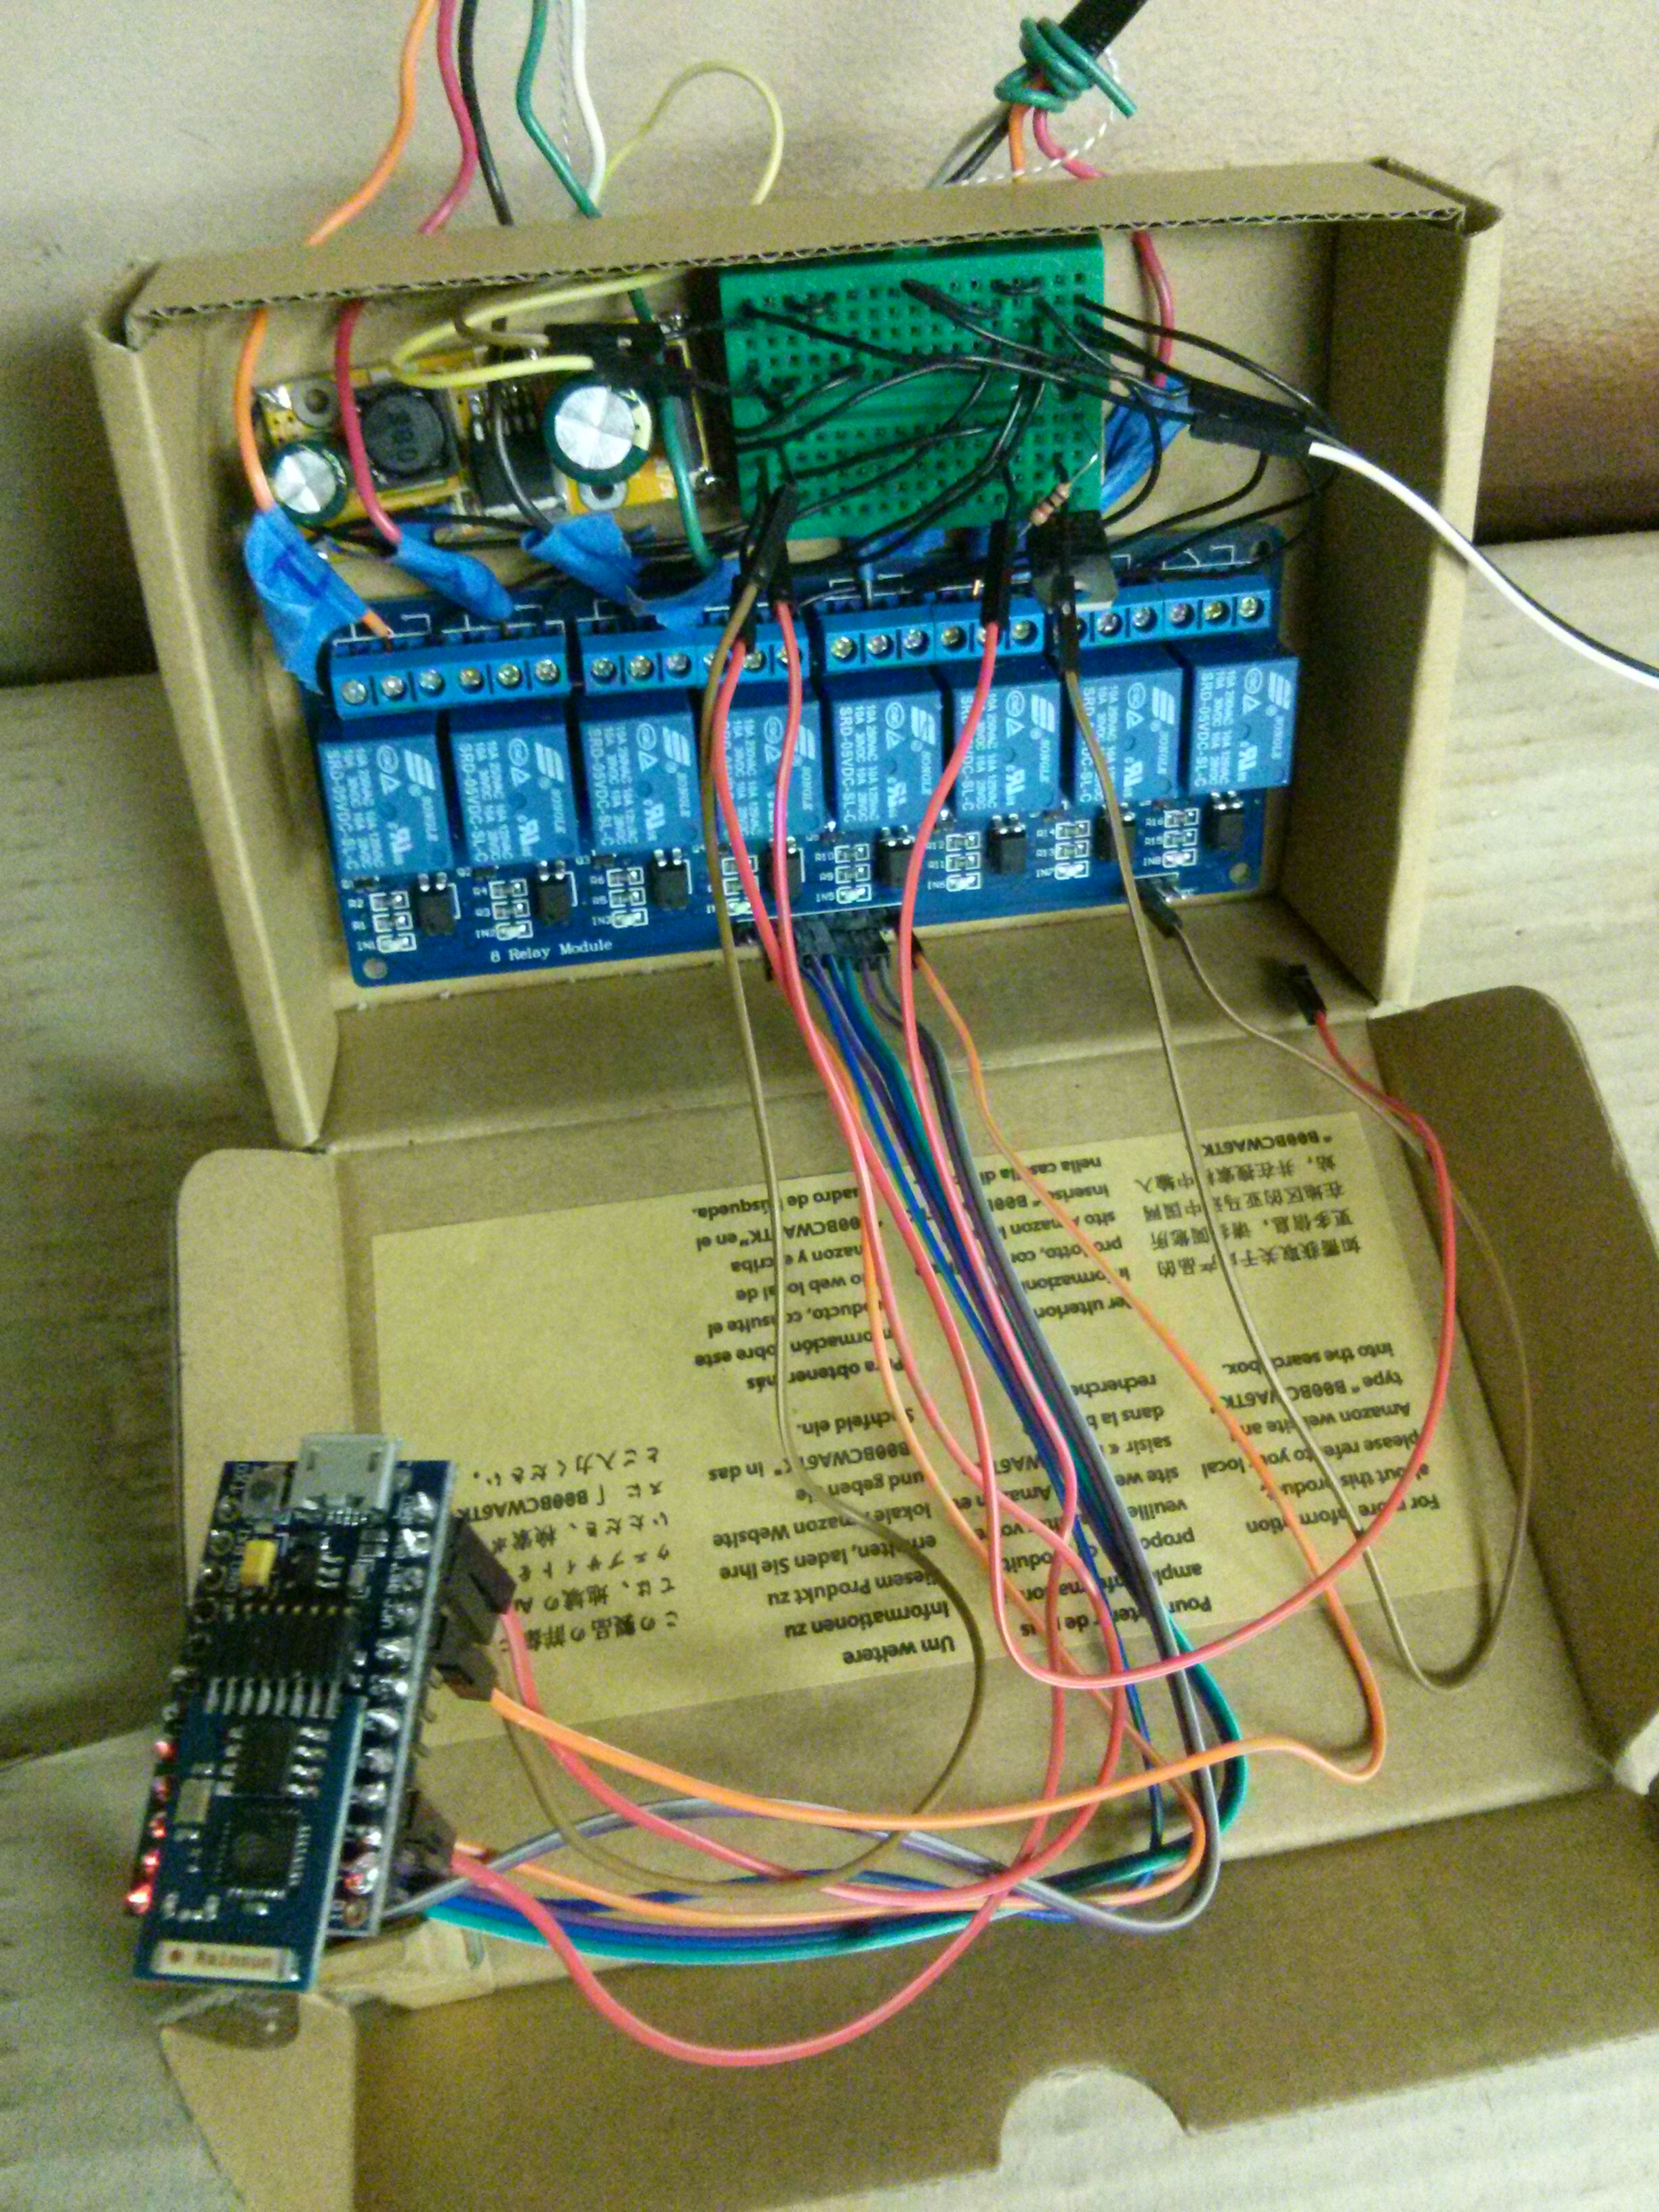
<p>After you have the software loaded, hook it up following the schematic. Hopefully you will end up with something that looks better (and is less of a fire hazard) than this: [caption id=”attachment_408” align=”alignnone” width=”768”]<a href="https://secretsciencelab.com/wp-content/uploads/2015/11/IMG_20151103_221016.jpg"><img src="/assets/images/2015-11-05-sprinkler-brain-cactus-micro-arduino-wi-fi-multi-zone-smart-sprinklers-diy-for-under-20/IMG_20151103_221016-768x1024.jpg" alt="AC/DC converter at top left. Mini breadboard to connect wires at top right. Transistor is on breadboard. 8-channel relay at bottom of box. Cactus micro with gazillion wires going to the breadboard. " /></a> AC/DC converter at top left. Mini breadboard to connect wires at top right. Transistor is on breadboard. 8-channel relay at bottom of box. Cactus micro with gazillion wires going to the relay and breadboard. I used the Rev1 Cactus in this pic. You should get the Rev2.[/caption]</p>

<p>Action shot: https://www.youtube.com/watch?v=6UwaNoreDKQ</p>

<p>Happy Sprinkling!</p>]]></content><author><name></name></author><category term="robots" /><category term="api" /><category term="appengine" /><category term="arduino" /><category term="cactus-micro" /><category term="cloud" /><category term="espduino" /><category term="google-appengine" /><category term="minutemap" /><category term="relay" /><category term="rest" /><category term="sprinkler" /><category term="thingspeak" /><summary type="html"><![CDATA[In some parts of the world, water usage is serious business. For example, there is a drought in California. If you live here, you know that they want you to water your lawn only twice a week. And if they catch you using too much water, they slap you with a higher rate for being a water pig. So water is serious business. But you love your garden and vegetables and trees and such. And they need water. So what can you do?]]></summary></entry><entry><title type="html">How to flash espduino firmware on Cactus Micro ESP8266 rev1</title><link href="/robots/2015/10/13/how-to-flash-espduino-firmware-on-cactus-micro-esp8266-rev1.html" rel="alternate" type="text/html" title="How to flash espduino firmware on Cactus Micro ESP8266 rev1" /><published>2015-10-13T00:00:00+00:00</published><updated>2015-10-13T00:00:00+00:00</updated><id>/robots/2015/10/13/how-to-flash-espduino-firmware-on-cactus-micro-esp8266-rev1</id><content type="html" xml:base="/robots/2015/10/13/how-to-flash-espduino-firmware-on-cactus-micro-esp8266-rev1.html"><![CDATA[<p>Modify Cactus Micro: <a href="http://blog.aprbrother.com/p/283">http://blog.aprbrother.com/p/283</a> 1) convert default serial port to hardware serial (cut/solder) 2) connect Digital pin 5 to ESP8266’s GPIO0 (so arduino sketch at the bottom of this page can pull ESP8266’s GPIO0 to GND - this puts the ESP8266 in program mode to receive firmware update)</p>

<p>Load Arduino programmer sketch - sends computer COM serial straight to ESP8266 hardware serial <a href="https://github.com/volca/arduino_esp8266_programmer/blob/master/arduino_esp8266_programmer.ino">https://github.com/volca/arduino_esp8266_programmer/blob/master/arduino_esp8266_programmer.ino</a></p>

<p>Flash firmware. Do NOT use esptool.py. I kept getting this error:</p>

<div class="language-plaintext highlighter-rouge"><div class="highlight"><pre class="highlight"><code>Connecting...
Traceback (most recent call last):
  File "./esptool.py", line 505, in 
    esp.connect()
  File "./esptool.py", line 158, in connect
    raise Exception('Failed to connect')
Exception: Failed to connect

</code></pre></div></div>

<p>Instead, use the GUI for Node MCU <a href="http://randomnerdtutorials.com/flashing-nodemcu-firmware-on-the-esp8266-using-windows/">http://randomnerdtutorials.com/flashing-nodemcu-firmware-on-the-esp8266-using-windows/</a> <a href="https://github.com/nodemcu/nodemcu-flasher">https://github.com/nodemcu/nodemcu-flasher</a></p>

<p>Click Config tab Uncheck the internal Node MCU firmware (selected by default) Browse for espduino 0x00000 bin Browse for espduino 0x40000 bin</p>

<p>Enjoy espduino! <a href="https://github.com/tuanpmt/espduino">https://github.com/tuanpmt/espduino</a></p>

<p>Important: when using the serial passthrough Arduino sketch, don’t change the default baud rate of espduino - I tried to be smart and set it at 9600 – didn’t work.</p>

<p>Below is the “passthrough” sketch I used to stream the firmware from USB through Arduino serial through ESP8266 hardware serial. It’s ugly and there are many other similar sketches, but I’m saving the one I used here, just in case.</p>

<div class="language-plaintext highlighter-rouge"><div class="highlight"><pre class="highlight"><code>/**************************************************
* Simple pass-through serial flash programmer 
* programming the ESP8266 by an Arduino
*
* Any serial data is transfered as-is between the 
* two devices, with one exception:
* Sending data to the Arduino will trigger a reset
* of the ESP8266 into bootloader mode, if it is the 
* first connection attempt since 1 second.
* If no data is send for 1 second, the ESP is reset 
* again into normal mode.
* 
* This resembles the comfortable DTS controlled 
* programming mode one have with an FTDI or similiar
* serial connection cable, where no manual reset of
* the ESP is needed to upload code and run it.
* Unfortunately there is no RTS/DTS control on the
* Arduino Serial library, so we solely rely on timing.
*
* If the esptool does not wait or retry long enough, 
* you have to send some chars to trigger the reset 
* eg. add this to your Makefiles / scripts:
*
* echo 'RESET' &gt;/dev/ttyACM0
* sleep 0.5 
* esptool .....
*
*
* Transmissions from the ESP are passed without any
* modification.
*
* You can not send serial commands (eg. to AT firmware)
* to the ESP with this tool, as it would frequently
* trigger resets into program mode.
*
* TODO: Provide control by magic keywords in the 
* serial data, like 'MAGIC_RESET_TO_BOOTLOADER'. 
* This way we can remove the timeouts and regain 
* interactive bidirectional serial console.
*
* TODO: tighten timings.
*
***************************************************/

/*
* Use an 3.3V Arduino, or TTL level shifter on RX / TX connections!
* The pin 9 / 10 connections are just pulled down, no level shifter is needed here.
* 
* connection table:
* ESP8266  Arduino
* GPIO0    5
* ENABLE   13
* RX       TX
* TX       RX
* GND      GND
* 
* Further connections to GND or VCC are needed depending on the ESP breakout module.
* 
* An LED on Arduino Pin 13 would indicate Program Mode.
*/

int program_pin = 5;
int enable_pin=13;
//int led_pin=13;

void setup()
{
  delay(2000);
  Serial.println("setup ESP8266");
  Serial1.begin(9600);
  Serial.begin(9600);
  pinMode(enable_pin, OUTPUT);
  pinMode(program_pin, OUTPUT);
  digitalWrite(program_pin, LOW);
  Serial.println("enabling ESP8266");
  digitalWrite(enable_pin,HIGH);
  delay(10000);

  Serial.println("ESP8266 programmer ready.");
}

long last_send=0;

// resets the ESP8266 into normal or program / bootloader mode
void reset_target(bool program_mode)
{
    return;
	if(program_mode)
	{
		pinMode(program_pin,OUTPUT);
	}
	else
	{
		pinMode(program_pin,INPUT);
	}
	//digitalWrite(led_pin, program_mode);
	
	delay(100);
	pinMode(enable_pin,INPUT);	
	delay(100);
	pinMode(enable_pin,OUTPUT);
	digitalWrite(enable_pin,HIGH);
	delay(500);
}

bool program_mode=true;
void loop()
{ 
  	while(Serial1.available())
	{
		Serial.write((Serial1.read()));
	}
  
  	// pass data from ESP to host, if any
	while(Serial1.available())
	{
		Serial.write((uint8_t)Serial1.read());
	}

	// pass data from host to ESP, if any
	if(Serial.available())
	{
		// if we are not in program mode, trigger reset to bootloader mode.
		if(!program_mode){
			//reset_target(true);
			program_mode=true;
		}			
		// pass data
		while(Serial.available())
		{
			Serial1.write((uint8_t)Serial.read());
		}
		last_send=millis();
	}

	// if the last transfer is more then one second ago,
	// trigger reset into normal mode.
	//if(last_send&gt;0 &amp;&amp; millis()-last_send&gt;1000)
	if(0)
	{
		reset_target(false);
		last_send=0;
		program_mode=false;
	}
}

</code></pre></div></div>

<p>P.S. You’ll probably want this Arduino library next: ArduinoJSON <a href="https://github.com/bblanchon/ArduinoJson/wiki/Using%20the%20library%20with%20Arduino">https://github.com/bblanchon/ArduinoJson/wiki/Using%20the%20library%20with%20Arduino</a></p>]]></content><author><name></name></author><category term="robots" /><category term="arduino" /><category term="cactus-micro" /><category term="firmware" /><summary type="html"><![CDATA[Modify Cactus Micro: http://blog.aprbrother.com/p/283 1) convert default serial port to hardware serial (cut/solder) 2) connect Digital pin 5 to ESP8266’s GPIO0 (so arduino sketch at the bottom of this page can pull ESP8266’s GPIO0 to GND - this puts the ESP8266 in program mode to receive firmware update)]]></summary></entry><entry><title type="html">DIY Electric Imp WiFi garage opener + sensor for under $50 (weekend project)</title><link href="/robots/2015/04/03/diy-electric-imp-wifi-garage-opener-sensor-for-under-50-weekend-project.html" rel="alternate" type="text/html" title="DIY Electric Imp WiFi garage opener + sensor for under $50 (weekend project)" /><published>2015-04-03T00:00:00+00:00</published><updated>2015-04-03T00:00:00+00:00</updated><id>/robots/2015/04/03/diy-electric-imp-wifi-garage-opener-sensor-for-under-50-weekend-project</id><content type="html" xml:base="/robots/2015/04/03/diy-electric-imp-wifi-garage-opener-sensor-for-under-50-weekend-project.html"><![CDATA[<p><strong>Background story / motivation</strong> One night, I opened my garage door to take out the trash. Then I came back in and went to bed. The next morning, as I was strapping my son into his car seat, he asked me, “Daddy, why is that exercise ball over there?” “What? What exercise ball?” “That one. Who put that ball there?” I replied without looking, “I don’t know, I didn’t put it there.” He said, “Maybe mama put it there.” “Maybe she did.” “Maybe it fell.” I looked back and saw it in the middle of the floor. Strange. Didn’t seem like her to leave it like that. Then I looked around. My toolbox was gone. I looked left. My bicycle was gone. I peeked into my wife’s car. Every compartment was open and trashed.</p>

<p>I had left the garage door open and we had been robbed.</p>

<p>Since then, whenever I left the house, I found myself checking and double-checking the garage door. And sometimes even after triple-checking… I would drive back to check ONE MORE TIME. Because you can’t be too sure. Even when I was home, I found myself constantly peeking into the garage to make sure I didn’t leave the door open again.</p>

<p>It was driving me nuts. So I decided to do something about it. If you’re like me, this weekend project will finally give you some peace of mind. If you’re handy with electronics and code, you could even get it done in one evening. When you’re done, you’ll get to open your garage door from your phone. And best of all, you’ll always know if your door is open or closed.</p>

<p>(By the way, before going for this solution to the garage door problem, I considered leaving my garage door open again. I really wanted to set a trap to destroy whoever dared to rob me again. But my wife said no. So here’s just some instructions for a garage door opener… instead of an automated crossbow turret.)</p>

<p><strong>Parts list</strong></p>

<ul>
  <li><a href="http://www.dx.com/p/arduino-5v-relay-module-blue-black-121354#.VLSUTCvF_Eg">5V Keyes Relay Module from Deal Extreme</a> ($3)</li>
  <li><a href="http://www.dx.com/p/rcw-0002-ultrasonic-ranging-distance-measurement-module-green-silver-264373#.VPkoQ_k4ZCg">Ultrasonic sensor from Deal Extreme</a> ($3.50)</li>
  <li>MINI USB cable + wall charger from eBay ($2) <em>Note: MINI USB, not micro USB like what you usually use for smartphones</em></li>
  <li><a href="http://www.digikey.com/product-detail/en/IMP001-US-R-ENG/1413-1003-ND/3979638">Electric Imp</a> + <a href="http://www.digikey.com/product-search/en/rf-if-and-rfid/rf-evaluation-and-development-kits-boards/3539644?k=%22electric%20imp%22">April breakout board</a> from DigiKey ($25 + $10 + lowest shipping I found)</li>
  <li><a href="http://www.amazon.com/dp/B00FGDV9WY/ref=pe_385040_127745480_TE_item">22-gauge hookup wire</a> ($0.06 / foot)</li>
  <li><a href="http://www.amazon.com/dp/B00ARUF2JM/ref=pe_385040_127745480_TE_item">Mini breadboard</a> ($1.25 each)</li>
  <li>0.1” Header pins</li>
</ul>

<p>Total: $44.75</p>

<p><strong>Tools list</strong></p>

<ul>
  <li><a href="http://www.amazon.com/dp/B00KXX6RLA/ref=pe_385040_127745480_TE_item">Soldering iron ($7)</a></li>
  <li><a href="http://www.amazon.com/dp/B00030AP48/ref=pe_385040_127745480_TE_item">60/40 Rosin core solder ($8)</a></li>
  <li><a href="http://www.amazon.com/dp/B000EVYGZA/ref=pe_385040_127745480_TE_item">INNOVA 3320 Digital-ranging multimeter ($23)</a> <em>optional</em></li>
</ul>

<p><strong>Finished pictures</strong></p>

<p>[caption id=”attachment_309” align=”alignnone” width=”768”]<a href="https://secretsciencelab.com/wp-content/uploads/2015/04/doorOpener.jpg"><img src="/assets/images/2015-04-03-diy-electric-imp-wifi-garage-opener-sensor-for-under-50-weekend-project/doorOpener-768x1024.jpg" alt="Mini breadboard ties everything together. The Imp is sitting in the April Breakout board. The April board's soldered header pins plug into the breadboard. The blue thing is the relay with 3 pins in the breadboard. You see a switch in the picture but I replaced that with an Ultrasonic sensor. The problem with the switch was my garage door doesn't always stop at the same place, so no physical switch was going to reliably trigger. On the other hand, the Ultrasonic sensor measures accurate distances up to 3m, so you can make a software switch that you can tune to perfection. Dinosaur for scale." /></a> Mini breadboard ties everything together. The Imp is sitting in the April Breakout board. The April board’s soldered header pins plug into the breadboard. The blue thing is the relay with 3 pins in the breadboard. You see a switch in the picture but I replaced that with an Ultrasonic sensor. The problem with the switch was my garage door doesn’t always stop at the same place, so no switch was going to reliably trigger. On the other hand, the Ultrasonic sensor measures accurate distances up to 3m, so you can make a software switch that you can tune to perfection. Dinosaur for scale.[/caption]</p>

<p>[caption id=”attachment_328” align=”alignnone” width=”300”]<a href="https://secretsciencelab.com/wp-content/uploads/2015/04/IMG_20150403_005430.jpg"><img src="/assets/images/2015-04-03-diy-electric-imp-wifi-garage-opener-sensor-for-under-50-weekend-project/IMG_20150403_005430-300x225.jpg" alt="I SEE YOU, garage door" /></a> I SEE YOU, garage door[/caption]</p>

<p>[caption id=”attachment_327” align=”alignnone” width=”300”]<a href="https://secretsciencelab.com/wp-content/uploads/2015/04/IMG_20150403_005508.jpg"><img src="/assets/images/2015-04-03-diy-electric-imp-wifi-garage-opener-sensor-for-under-50-weekend-project/IMG_20150403_005508-300x225.jpg" alt="Goodies tucked into small cardboard box on the side. USB power from ceiling." /></a> Goodies tucked into small cardboard box on the side. USB power from ceiling.[/caption]</p>

<p>[caption id=”attachment_326” align=”alignnone” width=”225”]<a href="https://secretsciencelab.com/wp-content/uploads/2015/04/IMG_20150403_005608.jpg"><img src="/assets/images/2015-04-03-diy-electric-imp-wifi-garage-opener-sensor-for-under-50-weekend-project/IMG_20150403_005608-225x300.jpg" alt="Black wires go from relay to the same terminals used by the wall switch." /></a> The tiny black wires connect the relay to the same terminals used by the wall switch.[/caption]</p>

<p>[caption id=”attachment_350” align=”alignnone” width=”614”]<a href="https://secretsciencelab.com/wp-content/uploads/2015/04/output_jkayfP.gif"><img src="/assets/images/2015-04-03-diy-electric-imp-wifi-garage-opener-sensor-for-under-50-weekend-project/output_jkayfP.gif" alt="Smartphone UI screenshot. Just a big button. The three checkboxes below it are to arm the button. This is so I can't accidentally press the big button." /></a> Smartphone UI screenshot. Just a big button. The three checkboxes below it are to arm the button. This is so I can’t accidentally press the big button.[/caption]</p>

<p><strong>Circuit diagram</strong></p>

<p>[caption id=”attachment_336” align=”alignnone” width=”300”]<a href="https://secretsciencelab.com/wp-content/uploads/2015/04/GarageDoorOpener.png"><img src="/assets/images/2015-04-03-diy-electric-imp-wifi-garage-opener-sensor-for-under-50-weekend-project/GarageDoorOpener-300x184.png" alt="I drew this with Fritzing!" /></a> I drew this with Fritzing![/caption]</p>

<p><strong>Electric Imp setup/prep</strong></p>

<p><a href="https://learn.sparkfun.com/tutorials/electric-imp-breakout-hookup-guide#hardware-hookup">Solder male headers onto Imp</a></p>

<p><strong>Electric Imp Agent code</strong></p>

<div class="language-plaintext highlighter-rouge"><div class="highlight"><pre class="highlight"><code>garageDoorState &lt;- "closed";

function requestHandler(request, response) {
  try {
    response.header("Access-Control-Allow-Origin", "*");

    if ("garageDoor" in request.query) {
        local code = request.query.garageDoor;
        local dataKey = request.query.dataKey;
        local url = "http://yourgaragedoorapp.appspot.com/rollcode"
          + "?verify=" + code + "&amp;dataKey=" + dataKey;
        
        // Verify rolling code provided against the saved code in your webapp's DB
        // (and only allow authorized users to save rolling codes in DB).
        // This extra security measure is optional. If you just want to 
        // open the door without extra checks, call:
        //    device.send("pulseDoor", code);
        http.get(url).sendasync(function(resp) {
            server.log(url);
            server.log(resp.body);
            local data = http.jsondecode(resp.body);
            if (!device.isconnected()) {
                server.log("garageDoor: Imp offline");
            }
            else if ("verify" in data &amp;&amp; data.verify == "success") {
                device.send("pulseDoor", code);
            }
            else {
                server.log("garageDoor: Bad code " + code);
            }
        });
    }
    else if ("getStatus" in request.query) {
        device.send("getDoorState", "");
    }
    else if ("showStatus" in request.query) {
        response.send(200, garageDoorState);
        return;
    }
    
    // send a response back saying everything was OK.
    response.send(200, "OK");
  } catch (ex) {
    response.send(500, "Internal Server Error: " + ex);
  }
}

// register the HTTP handler
http.onrequest(requestHandler);

function saveDoorState(state) {
    garageDoorState &lt;- state;
}

device.on("doorState", saveDoorState);

</code></pre></div></div>

<p><strong>Electric Imp Device code</strong></p>

<div class="language-plaintext highlighter-rouge"><div class="highlight"><pre class="highlight"><code>function pulseDoor(data) {
    server.log("PULSE DOOR START");
    doorSwitch.write(1);
    imp.wakeup(3, pulseDoorStop);
}
function pulseDoorStop() {
    server.log("PULSE DOOR STOP");
    doorSwitch.write(0);
}

function getDoorState(data) {
    range &lt;- Ultrasonic(trig, echo);
    local isOpen = 0;
    if (range.read_cm() &lt; 20) {
        isOpen = 1;
    }
    server.log("Door distance: " + range.read_cm() + " isOpen: " + isOpen);
    server.log("Door " + doorStateAsString(isOpen));
    agent.send("doorState", doorStateAsString(isOpen));
}
function doorStateAsString(state) {
    if (state == 1)
        return "open";
    
    return "closed";
}

class Ultrasonic {
    // consts
    static TO = 500; // timeout in ms
    
    // pins
    _trig   = null;
    _echo   = null;

    // aliased methods
    _tw     = null;
    _er     = null;
    _hu     = null;
    _hm     = null;

    // vars
    _es     = null; // echo start time
    _ee     = null; // echo end time

    constructor(trig, echo) {
        _trig = trig;
        _echo = echo;

        _hu   = hardware.micros.bindenv(hardware);
        _hm   = hardware.millis.bindenv(hardware);
        _tw   = _trig.write.bindenv(_trig);
        _er   = _trig.read.bindenv(_echo);
    }

    function read_cm() {
        local st = _hm(); // start time for timeout
        // Quickly pulse the trig pin
        _tw(0); _tw(1); _tw(0);

        // Wait for the rising edge on echo
        while (_er() == 0 &amp;&amp; (_hm() - st) &lt; TO);
        _es = _hu();

        // Time to the falling edge on echo
        while (_er() == 1 &amp;&amp; (_hm() - st) &lt; TO);
        _ee = _hu();

        //if ((_hm() - st) &gt;= TO) return -1;
        return (_ee - _es)/58.0;
    }
}

trig &lt;- hardware.pin1;
echo &lt;- hardware.pin2;
doorSwitch &lt;- hardware.pin7;

trig.configure(DIGITAL_OUT,0);
echo.configure(DIGITAL_IN);
doorSwitch.configure(DIGITAL_OUT, 0);
agent.on("pulseDoor", pulseDoor);
agent.on("getDoorState", getDoorState);

server.log("Imp online @ " + imp.getssid() + "!");

</code></pre></div></div>

<p><strong>(Optional) rolling authentication code</strong> I made a Google AppEngine app to be a gatekeeper and for the smartphone UI to open/close the door. The idea is:</p>

<ul>
  <li>Take advantage of AppEngine’s built-in authentication to control who can access your app</li>
  <li>When an authorized person taps “Open”, save a random “rolling code” into your web app’s DB</li>
  <li>Then, tell your Electric Imp to “Open” and pass it the rolling code you just generated</li>
  <li>When your Electric Imp Agent receives the “Open” command, it checks the received rolling code with your AppEngine webapp</li>
  <li>If the rolling code matches the latest code in the DB, the webapp destroys the code (so it cannot be reused) and the Imp Agent tells the Imp Device to open the door</li>
</ul>

<p>If you want to go this route and need more info, email me at aaron@secretsciencelab.com. If enough of you want it I’ll put it here. I’m just too lazy right now!</p>

<p><strong>Installation</strong> The hardest part is soldering header pins to the Imp, and soldering wires to the Ultrasonic sensor. But other than that, everything else is pretty much plug and play. That’s the beauty of using the Imp, the Keyes Relay and an Ultrasonic sensor. All the electronics are nicely packaged in each of them, so all you need to do is connect them with wires.</p>

<p>I stuffed everything into a small cardboard box and tied it to the frame of the garage door control box. I plugged the Imp’s USB adapter into the same outlet that powered the garage door control box. Lastly, I secured the Ultrasonic sensor to a bolt under the garage door rail using a twist-tie. Dirty, but simple!</p>

<p><strong>Bonus (advanced)</strong></p>

<ol>
  <li>Push your sensor data to <a href="https://data.sparkfun.com/">data.sparkfun.com</a> for free: [caption id=”attachment_354” align=”alignnone” width=”1000”]<a href="https://secretsciencelab.com/wp-content/uploads/2015/04/data.sparkfun.com_.png"><img src="/assets/images/2015-04-03-diy-electric-imp-wifi-garage-opener-sensor-for-under-50-weekend-project/data.sparkfun.com_-1024x433.png" alt="E.g., door open, door close" /></a> E.g., door open, door close[/caption]</li>
  <li>Convert your SparkFun CSV stream into an Atom RSS using my URL: https://secretsciencelab.com/wp-content/scripts/phant/feed.php?csv=http://data.sparkfun.com/output/<strong>YOUR_PUBLIC_KEY</strong>.csv&amp;key=<strong>state</strong> (replace the bolded parts).</li>
  <li>Plug your Atom RSS URL above into <a href="http://ifttt.com/">IFTTT</a> as a Feed recipe.</li>
  <li>Now you can tell IFTTT to: “If new Feed item, then do something.” E.g., “If my garage door opens or closes, text me.”</li>
</ol>

<p>Happy hacking :)</p>

<p><em>aaron@secretsciencelab.com</em></p>]]></content><author><name></name></author><category term="robots" /><category term="appengine" /><category term="electric-imp" /><category term="fritzing" /><category term="garage-door" /><category term="garage-door-opener" /><category term="ultrasonic" /><summary type="html"><![CDATA[Background story / motivation One night, I opened my garage door to take out the trash. Then I came back in and went to bed. The next morning, as I was strapping my son into his car seat, he asked me, “Daddy, why is that exercise ball over there?” “What? What exercise ball?” “That one. Who put that ball there?” I replied without looking, “I don’t know, I didn’t put it there.” He said, “Maybe mama put it there.” “Maybe she did.” “Maybe it fell.” I looked back and saw it in the middle of the floor. Strange. Didn’t seem like her to leave it like that. Then I looked around. My toolbox was gone. I looked left. My bicycle was gone. I peeked into my wife’s car. Every compartment was open and trashed.]]></summary></entry><entry><title type="html">How to teach Spyno to spy on (almost) anything</title><link href="/code/2015/02/24/how-to-teach-spyno-to-spy-on-almost-anything.html" rel="alternate" type="text/html" title="How to teach Spyno to spy on (almost) anything" /><published>2015-02-24T00:00:00+00:00</published><updated>2015-02-24T00:00:00+00:00</updated><id>/code/2015/02/24/how-to-teach-spyno-to-spy-on-almost-anything</id><content type="html" xml:base="/code/2015/02/24/how-to-teach-spyno-to-spy-on-almost-anything.html"><![CDATA[<p>Spyno likes JSON. It’s a JSONivore. So when you make a Spyno agent, you need to feed it a source URL in JSON format.</p>

<p>But what if you want to spy on things that are not in JSON? No worries. We have two tricks:</p>

<p><strong>Trick 1. Yahoo Query Language YQL free service</strong></p>

<p>“Use <a href="https://developer.yahoo.com/yql/">YQL</a> to convert XML to JSON &amp; vice versa. Access atom, rss, micro formats and more. You can even load CSV files from anywhere.”</p>

<p>So whether your favorite site is in RSS or XML, no problem. Just send it to Google Feed to transform it to JSON.</p>

<p>For example, say one of your guilty pleasures is Perez Hilton (don’t ask):</p>

<ol>
  <li>Find the RSS feed URL (E.g., http://i.perezhilton.com/?feed=rss2)</li>
  <li>
    <p>Drop the following query into this <a href="https://developer.yahoo.com/yql/">YQL form</a>:</p>

    <div class="language-plaintext highlighter-rouge"><div class="highlight"><pre class="highlight"><code> select * from rss where url='http://i.perezhilton.com/?feed=rss' limit 30
</code></pre></div>    </div>
  </li>
  <li>
    <p>That returns you the following Endpoint, which you can copy-paste into Spyno</p>

    <div class="language-plaintext highlighter-rouge"><div class="highlight"><pre class="highlight"><code> https://query.yahooapis.com/v1/public/yql?q=select%20*%20from%20rss%20where%20url%3D'http%3A%2F%2Fi.perezhilton.com%2F%3Ffeed%3Drss'%20limit%2030&amp;format=json&amp;env=store%3A%2F%2Fdatatables.org%2Falltableswithkeys
</code></pre></div>    </div>
  </li>
</ol>

<p><strong>Trick 2. Google Feed API</strong></p>

<p>“With the <a href="https://developers.google.com/feed/v1/jsondevguide">Feed API</a> you can download any public Atom, RSS, or Media RSS feed using only JavaScript, so you can easily mash up feeds with your content and other APIs.”</p>

<p><strong>Trick 3. Kimonolabs API</strong></p>

<p><a href="https://www.kimonolabs.com/">Kimono</a> is like the Swiss Army kitchen sink that turns any website into a JSON feed. It’s designed for scraping websites. But what’s special about it is that you can teach it what you want scraped. All you have to do is open the website you’re interested in using Kimono, then click elements on the page you want:</p>

<iframe src="//player.vimeo.com/video/82849382?title=0&amp;byline=0&amp;portrait=0" width="500" height="281" frameborder="0" webkitallowfullscreen="" mozallowfullscreen="" allowfullscreen=""></iframe>

<p>And these two tricks are about all you need to make JSON feeds for your <a href="https://secretsciencelab.com/?p=179">new Spyno Agent</a>.</p>

<p>Happy scraping, Spyno trainers!</p>]]></content><author><name></name></author><category term="code" /><category term="scraping" /><category term="spyno" /><summary type="html"><![CDATA[Spyno likes JSON. It’s a JSONivore. So when you make a Spyno agent, you need to feed it a source URL in JSON format.]]></summary></entry><entry><title type="html">How to view Spyno from anywhere</title><link href="/code/2015/02/24/how-to-view-spyno-from-anywhere.html" rel="alternate" type="text/html" title="How to view Spyno from anywhere" /><published>2015-02-24T00:00:00+00:00</published><updated>2015-02-24T00:00:00+00:00</updated><id>/code/2015/02/24/how-to-view-spyno-from-anywhere</id><content type="html" xml:base="/code/2015/02/24/how-to-view-spyno-from-anywhere.html"><![CDATA[<p>When you’re on your PC, open Spyno by clicking on him at the top right of Chrome:</p>

<p>[caption id=”attachment_252” align=”aligncenter” width=”76”]<a href="https://secretsciencelab.com/wp-content/uploads/2015/02/spynoButton.png"><img src="/assets/images/2015-02-24-how-to-view-spyno-from-anywhere/spynoButton.png" alt="OH HAI" /></a> OH HAI[/caption]</p>

<p>But what if you’re not at your PC? Visit your Public URL, of course!</p>

<p>Here’s how you get the Public URL for your Spyno page:</p>

<ol>
  <li>Type chrome://extensions in your Chrome’s address bar. Hit Enter.</li>
  <li>Visit Spyno’s options page
[caption id=”attachment_201” align=”alignnone” width=”300”]<a href="https://secretsciencelab.com/wp-content/uploads/2015/02/options.png"><img src="/assets/images/2015-02-24-how-to-view-spyno-from-anywhere/options-300x74.png" alt="Click" /></a> Click[/caption]4. Scroll to the bottom. Click “Get code”: [caption id=”attachment_255” align=”alignnone” width=”300”]<a href="https://secretsciencelab.com/wp-content/uploads/2015/02/spynoGetCode.png"><img src="/assets/images/2015-02-24-how-to-view-spyno-from-anywhere/spynoGetCode-300x239.png" alt="Click" /></a> Click[/caption]</li>
  <li>Sign in with Google and you’ll see this: [caption id=”attachment_257” align=”alignnone” width=”300”]<a href="https://secretsciencelab.com/wp-content/uploads/2015/02/spynoCodePage.png"><img src="/assets/images/2015-02-24-how-to-view-spyno-from-anywhere/spynoCodePage-300x215.png" alt="Code Page" /></a> The link marked (1) is your public URL. Send that to your phone to view Spyno from your phone. Copy the code marked (2) to your PC’s Spyno option page. Spyno uses that code to update your public page.[/caption] [caption id=”attachment_258” align=”alignnone” width=”300”]<a href="https://secretsciencelab.com/wp-content/uploads/2015/02/spynoEnterCode.png"><img src="/assets/images/2015-02-24-how-to-view-spyno-from-anywhere/spynoEnterCode-300x258.png" alt="Paste your code here and click Save" /></a> Paste your code here and click Save[/caption]</li>
  <li>Ta-da!</li>
</ol>

<p>Now you can take Spyno with you anywhere.</p>

<p>Next: <a href="https://secretsciencelab.com/?p=260">How to teach Spyno to spy on (almost) anything</a></p>]]></content><author><name></name></author><category term="code" /><category term="public" /><category term="spyno" /><summary type="html"><![CDATA[When you’re on your PC, open Spyno by clicking on him at the top right of Chrome:]]></summary></entry></feed>